Home > Europe > United Kingdom > Scotland > Edinburgh > Edinburgh
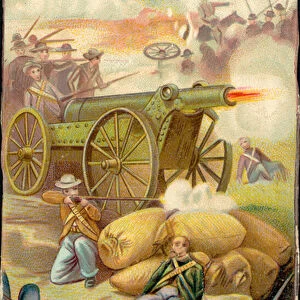
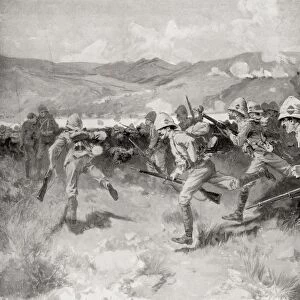
The Battle of Colenso - Queens (Royal West Surrey) Regiment Leading the Central Attack, 1900
 Regiment Leading the Central Attack, 1900")
![]()
Wall Art and Photo Gifts from Heritage Images
The Battle of Colenso - Queens (Royal West Surrey) Regiment Leading the Central Attack, 1900
The Battle of Colenso - Queens (Royal West Surrey) Regiment Leading the Central Attack, 1900. From " South Africa and the Transvaal War, Vol. II", by Louis Creswicke. [T. C. & E. C. Jack, Edinburgh, 1900]
Heritage Images features heritage image collections
Media ID 19780677
© The Print Collector/Heritage Images
1899 1902 2nd Boer War Advancing Assault Bamp W Battle Of Colenso Boer War Boer Wars British Army Charging Conflict Creswicke Explosion Jack Louis Louis Creswicke Pith Helmet Pith Helmets Regiment Rifle Rifles Running Second Boer War Second Transvaal War South Africa South Africa And The Transvaal War South African War Tc And Ec Tc And Ec Jack Topee Topees Transvaal War Battlefield British Empire
FEATURES IN THESE COLLECTIONS
> Africa
> South Africa
> Related Images
> Arts
> Literature
> Illustration
> Arts
> Literature
> Europe
> United Kingdom
> England
> Surrey
> Related Images
> Europe
> United Kingdom
> Scotland
> Edinburgh
> Edinburgh
> Europe
> United Kingdom
> Scotland
> Lothian
> Edinburgh
EDITORS COMMENTS
This print captures a pivotal moment in history - "The Battle of Colenso". Taken in 1900, it depicts the brave soldiers of the Queens (Royal West Surrey) Regiment leading a central attack during this intense conflict. The image is sourced from Louis Creswicke's renowned book, "South Africa and the Transvaal War, Vol. II" published by T. C. & E. C. Jack in Edinburgh. In this powerful scene, we witness the soldiers charging forward with determination and courage as they navigate through explosions and gunfire. Dressed in their military uniforms, armed with rifles and other weapons, these valiant men epitomize the spirit of warfare during that era. The composition showcases not only the intensity of battle but also highlights elements such as colonialism, British imperialism, and the struggles faced by both sides during this tumultuous time in South African history. With its striking contrast between light and shadow captured through photography techniques prevalent at that time, this print transports us back to an era when conflicts were fought on vast battlefields rather than digital screens. As we gaze upon this historical artifact preserved by Heritage Images' collection, we are reminded of the sacrifices made by those who fought for their nations amidst challenging circumstances. It serves as a poignant reminder of our shared human history marked by bravery, resilience, and ultimately striving for peace.
MADE IN AUSTRALIA
Safe Shipping with 30 Day Money Back Guarantee
FREE PERSONALISATION*
We are proud to offer a range of customisation features including Personalised Captions, Color Filters and Picture Zoom Tools
SECURE PAYMENTS
We happily accept a wide range of payment options so you can pay for the things you need in the way that is most convenient for you
* Options may vary by product and licensing agreement. Zoomed Pictures can be adjusted in the Cart.