Home > Europe > United Kingdom > Scotland > Edinburgh > Edinburgh
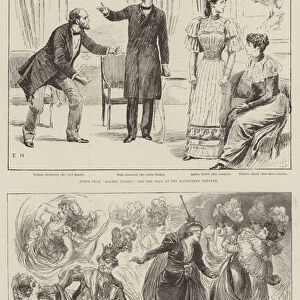
Sebastian: Why! Theres for thee! And there! And there!, c1875. Artist: Robert Charles Dudley

![]()
Wall Art and Photo Gifts from Heritage Images
Sebastian: Why! Theres for thee! And there! And there!, c1875. Artist: Robert Charles Dudley
Sebastian: Why! Theres for thee! And there! And there!, c1875. Act IV, Scene I, from Shakespeares Twelfth Night. From The Illustrated Library Shakespeare. [William Mackenzie, London, Edinburgh and Glasgow, c1875]
Heritage Images features heritage image collections
Media ID 14968926
© The Print Collector
Chromolithograph Dudley Four People Frustrated Frustration Illustrated Library Shakespeare Jester Mackenzie Overweight Robert Charles Robert Charles Dudley Sebastian Shakespeare Strangling Strangulation Twelfth Eve Twelfth Night William Mackenzie William Shakespeare
FEATURES IN THESE COLLECTIONS
> Arts
> Artists
> C
> William Charles
> Arts
> Artists
> D
> Robert Charles Dudley
> Arts
> Artists
> D
> William Day
> Arts
> Artists
> S
> William Shakespeare
> Arts
> Literature
> Europe
> United Kingdom
> Scotland
> Edinburgh
> Edinburgh
> Europe
> United Kingdom
> Scotland
> Lothian
> Edinburgh
> Europe
> United Kingdom
> Scotland
> Strathclyde
> Glasgow
EDITORS COMMENTS
In this print titled "Sebastian: Why! Theres for thee! And there! And there!", we are transported back to the 19th century, immersing ourselves in the dramatic world of Shakespeare's Twelfth Night. The artist, Robert Charles Dudley, skillfully captures a pivotal moment from Act IV, Scene I of the play. Set outdoors on a sunny day, we witness a group of four men engaged in an intense performance. One man takes center stage as Sebastian, his frustration evident on his face and in his body language. His outstretched arm points emphatically towards multiple directions, symbolizing the chaos unfolding around him. The concept of strangulation is subtly depicted through the jester-like character who appears overweight and struggles to breathe under Sebastian's grip. This visual metaphor adds depth to the scene and highlights the tension within this particular moment of Twelfth Night. Dudley's chromolithograph technique brings vibrant colors to life and enhances our connection with these characters from literature. As viewers, we can almost hear their voices echoing through time as they bring Shakespeare's words alive before us. This remarkable print is part of The Illustrated Library Shakespeare collection published by William Mackenzie in London, Edinburgh, and Glasgow around 1875. It serves as a testament to both Dudley's artistic talent and Shakespeare's enduring legacy that continues to captivate audiences even today.
MADE IN AUSTRALIA
Safe Shipping with 30 Day Money Back Guarantee
FREE PERSONALISATION*
We are proud to offer a range of customisation features including Personalised Captions, Color Filters and Picture Zoom Tools
SECURE PAYMENTS
We happily accept a wide range of payment options so you can pay for the things you need in the way that is most convenient for you
* Options may vary by product and licensing agreement. Zoomed Pictures can be adjusted in the Cart.