Home > Historic > World War I and II > World War I
Australian navy WWI

![]()
Wall Art and Photo Gifts from Mary Evans Picture Library
Australian navy WWI
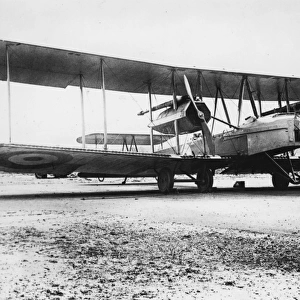
Royal Australian Flotilla HMAS Farramata secured to the bank, 400 miles up the Sepik River in New Guinea during World War I
Mary Evans Picture Library makes available wonderful images created for people to enjoy over the centuries
Media ID 4453417
© Mary Evans Picture Library 2015 - https://copyrighthub.org/s0/hub1/creation/maryevans/MaryEvansPictureID/10297671
Australian Flotilla Guinea Hmas Papua Sepik Ww 1
FEATURES IN THESE COLLECTIONS
> Historic
> World War I and II
> World War I
> Services
> Royal Navy
EDITORS COMMENTS
This evocative photograph captures the moment of respite for the crew of HMAS Farramata, a Royal Australian Navy vessel, during the arduous journey up the Sepik River in New Guinea during World War I. Dated 1914, the image shows the ship secured to the muddy riverbank, surrounded by lush vegetation and local villagers. The First World War saw Australia's naval forces play a significant role in the defense of its territories in the Pacific, with the Royal Australian Navy's Pacific Patrol establishing a base in Rabaul, New Britain, from where they launched various operations in the region. The Sepik River, located in the northern part of New Guinea, was a strategic location due to its proximity to German-held territories. HMAS Farramata, a transport ship, was tasked with delivering supplies and reinforcements to Australian troops stationed in the area. The journey up the Sepik River was a challenging one, with the ships navigating treacherous waters and encountering local resistance. This photograph offers a glimpse into the harsh realities of war in the Pacific during the early 20th century. The crew of HMAS Farramata, having successfully completed their mission, are seen here taking a break from their duties, with some even engaging with the local population. The image serves as a poignant reminder of the sacrifices made by the Australian Navy during World War I and the complexities of the conflict in the Pacific.
MADE IN AUSTRALIA
Safe Shipping with 30 Day Money Back Guarantee
FREE PERSONALISATION*
We are proud to offer a range of customisation features including Personalised Captions, Color Filters and Picture Zoom Tools
FREE COLORIZATION SERVICE
You can choose advanced AI Colorization for this picture at no extra charge!
SECURE PAYMENTS
We happily accept a wide range of payment options so you can pay for the things you need in the way that is most convenient for you
* Options may vary by product and licensing agreement. Zoomed Pictures can be adjusted in the Cart.