Australian Shell Explosion Print, 1917



Framed Prints From Fine Art Finder
This artwork is available as
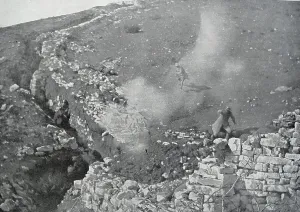
Framed Print of Shrapnel exploding from an Australian Shell, 1917
UIG1581629 Shrapnel exploding from an Australian Shell, 1917 by Unknown photographer, (20th century); (add.info.: Photograph of Shrapnel exploding from an Australian Shell fired at French positions on the Italian Front. Dated 1917.); Universal History Archive/UIG. © Bridgeman Images
Artwork Licensed From Fine Art Finder (www.bridgemanimages.com)
Your chosen combination is quickly and professionally made to order - Shipping & Delivery Details
If you are not entirely happy with your items, simply return them to us within 30 days for a replacement or full refund - 30 Day Returns
Media ID 39955812
Editors' Comments
Our Framed Prints showcase the powerful and poignant image 'Shrapnel exploding from an Australian Shell, 1917' - a striking reminder of the bravery and sacrifice of those who served in World War I. A addition to any room, this print is not only visually but also serves as a meaningful tribute to the past.
This artwork is also available as...
Photo Prints - Acquire Photo Prints of 'Shrapnel exploding from an Australian Shell, 1917' by Bridgeman Images, a historic photograph available through Fine Art Finder. This authentic image is perfect for decorating homes and offices with art prints. Order your Photo Prints today and bring a piece of history into your space.
Poster Prints - Discover 'Shrapnel exploding from an Australian Shell, 1917' by Bridgeman Images on Fine Art Finder, now available as a Poster Print. Perfect for art enthusiasts and history buffs, our Poster Prints are ideal for home decor and office spaces. Add a touch of historical significance to your walls with this artwork.
Metal Prints - Metal Prints featuring historical images like 'Shrapnel exploding from an Australian Shell, 1917' by Bridgeman Images. Durable and long-lasting, these premium prints are perfect for art enthusiasts and history buffs alike. Add a touch of sophistication to any room with our Metal Prints.
Canvas Prints - Add a touch of history to your home with our Canvas Prints, featuring iconic war photography. 'Shrapnel exploding from an Australian Shell, 1917' by Bridgeman Images is now available as a canvas print. Perfect for art lovers and history enthusiasts, our Canvas Prints make wall decor.
Cushions - unique Cushions featuring historic artwork. This stunning Cushion showcases 'Shrapnel exploding from an Australian Shell, 1917' by Bridgeman Images, a powerful piece of World War I history. Perfect for adding a touch of vintage charm to any room, these decorative Cushions are ideal for living rooms, bedrooms and offices.
Premium A1 (A2 Poster)
Ready to Hang Contemporary Framed Prints adds style, protection, and a polished touch to your space - effortlessly.
Your artwork will be printed as shown in the preview. To adjust please select Print Options under the Buy button
Premium Paradise Wooden Range A1 Premium Poster Frame (86x62cm) with A2 Poster (59x42cm) and mounted behind a white matt board to make your photo really stand out. FSC Certified and Rainforest Alliance Certified for environmental, social, and economic sustainably. High transparency tempered glass window with a smooth finished frame. Great for filling empty walls, decorating blank spaces, or creating eye-catching gallery walls. Frames arrive ready to hang. Sent with secure, protective packaging. Smooth wooden veneer mimics the real wood look and feel with ultra-durable scratch resistance tempered glass. Note: measurements provided are estimated outer dimensions, which include both the image and the frame. While we aim to keep sizing consistent, exact dimensions may vary slightly due to differences in print size or production requirements, which may result in a variation in the overall size (up to approximately 2.5cm (1"))
These are individually made so all sizes are approximate
Estimated Image Size (if not cropped) is 58.8cm x 41.4cm (23.1" x 16.3")
Estimated Product Size is 86.6cm x 62cm (34.1" x 24.4")
Features in These Collections
Home > Fine Art Finder > Artists > British School
Home > Fine Art Finder > Artists > Carl Simon
Home > Fine Art Finder > Artists > Unknown Photographer
Home > Historic > World War I and II
Home > Oceania > Australia > Related