Fraud Blocker Skip to main content

Anglo Zulu War Collection

"The Anglo-Zulu War: A Glimpse into the Battlefields and Heroes" The Zulu War

Background imageAnglo Zulu War Collection: Saving the Queens Colour at the Battle of Isandlwana (colour litho)

Saving the Queens Colour at the Battle of Isandlwana (colour litho)
3697386 Saving the Queens Colour at the Battle of Isandlwana (colour litho) by Neuville, Alphonse Marie de (1835-85); Private Collection; (add.info)

Background imageAnglo Zulu War Collection: The Zulu War, Retreat of Fugitives from Isanhlwana across the Buffalo River (engraving)

The Zulu War, Retreat of Fugitives from Isanhlwana across the Buffalo River (engraving)
1106749 The Zulu War, Retreat of Fugitives from Isanhlwana across the Buffalo River (engraving) by Overend, William Heysham (1851-98) (after); Private Collection; (add.info.: The Zulu War)

Background imageAnglo Zulu War Collection: The Zulu War, Fugitives Drift, Buffalo River, with the Stone to which Lieutenant Melvill clung

The Zulu War, Fugitives Drift, Buffalo River, with the Stone to which Lieutenant Melvill clung (engraving)
1099744 The Zulu War, Fugitives Drift, Buffalo River, with the Stone to which Lieutenant Melvill clung (engraving) by English School, (19th century); Private Collection; (add.info.: The Zulu War)

Background imageAnglo Zulu War Collection: Plan of the Defence of Rorke's Drift, Anglo-Zulu War

Plan of the Defence of Rorke's Drift, Anglo-Zulu War
Vintage engraving of Plan of the Defence of Rorke's Drift, was an engagement in the Anglo-Zulu War. The successful British defence of the mission station of Rorke's Drift

Background imageAnglo Zulu War Collection: The Zulu War, Natal Mounted Police, under Major Dartnell, on their Way to the Front (engraving)

The Zulu War, Natal Mounted Police, under Major Dartnell, on their Way to the Front (engraving)
1106531 The Zulu War, Natal Mounted Police, under Major Dartnell, on their Way to the Front (engraving) by English School, (19th century); Private Collection; (add.info.: The Zulu War)

Background imageAnglo Zulu War Collection: Front view of the Storehouse at Rorkes Drift, Buffalo River, c. 1879 (b / w photo)

Front view of the Storehouse at Rorkes Drift, Buffalo River, c. 1879 (b / w photo)
NAM254154 Front view of the Storehouse at Rorkes Drift, Buffalo River, c.1879 (b/w photo) by Lloyd, James (fl.1870s); National Army Museum

Background imageAnglo Zulu War Collection: Major Richard Marter, the Capturer of Cetewayo (engraving)

Major Richard Marter, the Capturer of Cetewayo (engraving)
1099766 Major Richard Marter, the Capturer of Cetewayo (engraving) by English School, (19th century); Private Collection; (add.info.: Major Richard Marter, the Capturer of Cetewayo)

Background imageAnglo Zulu War Collection: The Zulu War, the Laager Method of Defence (engraving)

The Zulu War, the Laager Method of Defence (engraving)
1106750 The Zulu War, the Laager Method of Defence (engraving) by Overend, William Heysham (1851-98) (after); Private Collection; (add.info.: The Zulu War, the Laager Method of Defence)

Background imageAnglo Zulu War Collection: The Zulu War, View of the Spot where the Prince Imperial was killed, looking East (engraving)

The Zulu War, View of the Spot where the Prince Imperial was killed, looking East (engraving)
1099689 The Zulu War, View of the Spot where the Prince Imperial was killed, looking East (engraving) by Prior, Melton (1845-1910) (after); Private Collection; (add.info.: The Zulu War)

Background imageAnglo Zulu War Collection: The Zulu War, Isandhlwana revisited, fetching away the Waggons, 21 May (engraving)

The Zulu War, Isandhlwana revisited, fetching away the Waggons, 21 May (engraving)
1099970 The Zulu War, Isandhlwana revisited, fetching away the Waggons, 21 May (engraving) by Overend, William Heysham (1851-98) (after); Private Collection; (add.info.: The Zulu War)

Background imageAnglo Zulu War Collection: The Zulu War, Fort Melvill, near Isandhlwana (engraving)

The Zulu War, Fort Melvill, near Isandhlwana (engraving)
1106701 The Zulu War, Fort Melvill, near Isandhlwana (engraving) by English School, (19th century); Private Collection; (add.info.: The Zulu War, Fort Melvill, near Isandhlwana)

Background imageAnglo Zulu War Collection: The Zulu War, Luneberg and the Pongola River (engraving)

The Zulu War, Luneberg and the Pongola River (engraving)
1106638 The Zulu War, Luneberg and the Pongola River (engraving) by English School, (19th century); Private Collection; (add.info.: The Zulu War, Luneberg and the Pongola River)

Background imageAnglo Zulu War Collection: The Zulu War, View of the Spot where the Prince Imperial was killed, looking West (engraving)

The Zulu War, View of the Spot where the Prince Imperial was killed, looking West (engraving)
1099688 The Zulu War, View of the Spot where the Prince Imperial was killed, looking West (engraving) by Prior, Melton (1845-1910) (after); Private Collection; (add.info.: The Zulu War)

Background imageAnglo Zulu War Collection: Plan of the Battle of Isandlwana, Anglo-Zulu War

Plan of the Battle of Isandlwana, Anglo-Zulu War
Vintage engraving of Plan of the Battle of Isandlwana the first major encounter in the Anglo-Zulu War between the British Empire and the Zulu Kingdom

Background imageAnglo Zulu War Collection: Map of the area around Isandlwana, Anglo-Zulu War, 1879

Map of the area around Isandlwana, Anglo-Zulu War, 1879
Vintage engraving of Map of the area around Isandlwana, Anglo-Zulu War, 1879

Background imageAnglo Zulu War Collection: Plan of the Battle of Intombe, Anglo Zulu war

Plan of the Battle of Intombe, Anglo Zulu war
Vintage illustration of Plan of the Battle of Intombe, (also Intombi or Intombi River Drift) was an action fought on 12 March 1879, between Zulu troops and British soldiers defending a supply convoy

Background imageAnglo Zulu War Collection: Plan of the Battle of Hlobane, Anglo Zulu war

Plan of the Battle of Hlobane, Anglo Zulu war
Vintage illustration of Plan of the Battle of Hlobane, (28 March 1879) took place at Hlobane, near the modern town of Vryheid in KwaZulu-Natal, South Africa during the Anglo-Zulu War

Background imageAnglo Zulu War Collection: Plan of the Battle of Gingindlovu, Anglo Zulu War

Plan of the Battle of Gingindlovu, Anglo Zulu War
Vintage illustration of Plan of the Battle of Gingindlovu fought on 2 April 1879 between a British relief column sent to break the Siege of Eshowe and a Zulu impi of King Cetshwayo

Background imageAnglo Zulu War Collection: Plan of the Battle of Inyezane, or Siege of Eshowe, 1879

Plan of the Battle of Inyezane, or Siege of Eshowe, 1879
Vintage engraving of Plan of the Battle of Inyezane, or Siege of Eshowewhich took place during the Anglo-Zulu War of 1879

Background imageAnglo Zulu War Collection: The Late Zulu War, Distribution of Medals to the Fifty-Eighth Regiment

The Late Zulu War, Distribution of Medals to the Fifty-Eighth Regiment and the Natal Troops at Maritzburg by Sir Evelyn
1060523 The Late Zulu War, Distribution of Medals to the Fifty-Eighth Regiment and the Natal Troops at Maritzburg by Sir Evelyn Wood (engraving) by Durand

Background imageAnglo Zulu War Collection: Zulus advancing to attack at Kambula Hill, March 29th 1879 (litho)

Zulus advancing to attack at Kambula Hill, March 29th 1879 (litho)
STC373391 Zulus advancing to attack at Kambula Hill, March 29th 1879 (litho) by English School, (19th century); Private Collection; The Stapleton Collection; English, out of copyright

Background imageAnglo Zulu War Collection: The War in South Africa, Her Majesty presenting New Colours to the Fourth (Kings Own Regiment)

The War in South Africa, Her Majesty presenting New Colours to the Fourth (Kings Own Regiment) at Windsor Castle
1060012 The War in South Africa, Her Majesty presenting New Colours to the Fourth (Kings Own Regiment) at Windsor Castle, under Orders for the Cape (engraving) by English School

Background imageAnglo Zulu War Collection: The Zulu War, the Heliograph at Work, Flashing Messages to a Beleaguered Force (engraving)

The Zulu War, the Heliograph at Work, Flashing Messages to a Beleaguered Force (engraving)
1106754 The Zulu War, the Heliograph at Work, Flashing Messages to a Beleaguered Force (engraving) by English School, (19th century); Private Collection; (add.info.: The Zulu War)

Background imageAnglo Zulu War Collection: The Zulu War, the March to Ekowe, the Relief Column crossing a Drift (engraving)

The Zulu War, the March to Ekowe, the Relief Column crossing a Drift (engraving)
1106752 The Zulu War, the March to Ekowe, the Relief Column crossing a Drift (engraving) by English School, (19th century); Private Collection; (add.info.: The Zulu War, the March to Ekowe)

Background imageAnglo Zulu War Collection: The War in South Africa, Mr Moodie, Magistrate of Ladysmith, collecting Native Hut Tax (engraving)

The War in South Africa, Mr Moodie, Magistrate of Ladysmith, collecting Native Hut Tax (engraving)
1106726 The War in South Africa, Mr Moodie, Magistrate of Ladysmith, collecting Native Hut Tax (engraving) by English School, (19th century); Private Collection; (add.info.: The War in South Africa)

Background imageAnglo Zulu War Collection: Officers killed in the Zulu War (engraving)

Officers killed in the Zulu War (engraving)
1106685 Officers killed in the Zulu War (engraving) by English School, (19th century); Private Collection; (add.info.: Officers killed in the Zulu War)

Background imageAnglo Zulu War Collection: The Zulu War, Frontier Light Horse on Vidette Duty discovering Zulus near Colonel Woods Camp

The Zulu War, Frontier Light Horse on Vidette Duty discovering Zulus near Colonel Woods Camp (engraving)
1106662 The Zulu War, Frontier Light Horse on Vidette Duty discovering Zulus near Colonel Woods Camp (engraving) by European School, (19th century); Private Collection; (add.info.: The Zulu War)

Background imageAnglo Zulu War Collection: The Zulu War, Troops crossing the Tugela under the Inspection of Lord Chelmsford (engraving)

The Zulu War, Troops crossing the Tugela under the Inspection of Lord Chelmsford (engraving)
1106651 The Zulu War, Troops crossing the Tugela under the Inspection of Lord Chelmsford (engraving) by English School, (19th century); Private Collection; (add.info.: The Zulu War)

Background imageAnglo Zulu War Collection: The Zulu War, Attack on an Escort of the 80th Regiment at the Intombi River (engraving)

The Zulu War, Attack on an Escort of the 80th Regiment at the Intombi River (engraving)
1106643 The Zulu War, Attack on an Escort of the 80th Regiment at the Intombi River (engraving) by English School, (19th century); Private Collection; (add.info.: The Zulu War)

Background imageAnglo Zulu War Collection: The Zulu War, the 91st (Princess Louise s) Highlanders leaving the Pretoria at Durban (engraving)

The Zulu War, the 91st (Princess Louise s) Highlanders leaving the Pretoria at Durban (engraving)
1106629 The Zulu War, the 91st (Princess Louise s) Highlanders leaving the Pretoria at Durban (engraving) by English School, (19th century); Private Collection; (add.info.: The Zulu War)

Background imageAnglo Zulu War Collection: The Zulu War, Fort Ekowe (engraving)

The Zulu War, Fort Ekowe (engraving)
1106620 The Zulu War, Fort Ekowe (engraving) by English School, (19th century); Private Collection; (add.info.: The Zulu War, Fort Ekowe)

Background imageAnglo Zulu War Collection: Camp of the 80th Regiment on the Zulu Border (engraving)

Camp of the 80th Regiment on the Zulu Border (engraving)
1106607 Camp of the 80th Regiment on the Zulu Border (engraving) by English School, (19th century); Private Collection; (add.info.: Camp of the 80th Regiment on the Zulu Border)

Background imageAnglo Zulu War Collection: The Zulu War, Sketches at Rorkes Drift (engraving)

The Zulu War, Sketches at Rorkes Drift (engraving)
1106598 The Zulu War, Sketches at Rorkes Drift (engraving) by English School, (19th century); Private Collection; (add.info.: The Zulu War, Sketches at Rorkes Drift)

Background imageAnglo Zulu War Collection: The Zulu War, Recovery of the Lost Colours of the 24th Regiment

The Zulu War, Recovery of the Lost Colours of the 24th Regiment, a Scene in the Fort at Helpmakaar (engraving)
1106575 The Zulu War, Recovery of the Lost Colours of the 24th Regiment, a Scene in the Fort at Helpmakaar (engraving) by English School, (19th century); Private Collection; (add.info.: The Zulu War)

Background imageAnglo Zulu War Collection: The Zulu War, Camp of 13th and 90th Regiments at Elands Neck

The Zulu War, Camp of 13th and 90th Regiments at Elands Neck, Transvaal Border of Zululand (engraving)
1106553 The Zulu War, Camp of 13th and 90th Regiments at Elands Neck, Transvaal Border of Zululand (engraving) by English School, (19th century); Private Collection; (add.info.: The Zulu War)

Background imageAnglo Zulu War Collection: The Zulu War, Sketches at the Victoria Docks on the Departure of the 17th Lancers (engraving)

The Zulu War, Sketches at the Victoria Docks on the Departure of the 17th Lancers (engraving)
1106550 The Zulu War, Sketches at the Victoria Docks on the Departure of the 17th Lancers (engraving) by English School, (19th century); Private Collection; (add.info.: The Zulu War)

Background imageAnglo Zulu War Collection: The Zulu War, Officers of the 24th Regiment killed at Isandula (engraving)

The Zulu War, Officers of the 24th Regiment killed at Isandula (engraving)
1106549 The Zulu War, Officers of the 24th Regiment killed at Isandula (engraving) by English School, (19th century); Private Collection; (add.info.: The Zulu War)

Background imageAnglo Zulu War Collection: Map of Zululand with the Adjoining Frontiers (engraving)

Map of Zululand with the Adjoining Frontiers (engraving)
1106546 Map of Zululand with the Adjoining Frontiers (engraving) by English School, (19th century); Private Collection; (add.info.: Map of Zululand with the Adjoining Frontiers)

Background imageAnglo Zulu War Collection: Troop-Ships for the Zulu War Reinforcements, the Dublin Castle (engraving)

Troop-Ships for the Zulu War Reinforcements, the Dublin Castle (engraving)
1106545 Troop-Ships for the Zulu War Reinforcements, the Dublin Castle (engraving) by English School, (19th century); Private Collection; (add.info.: Troop-Ships for the Zulu War Reinforcements)

Background imageAnglo Zulu War Collection: The Zulu War, Durban Mounted Volunteers under the Late Captain W Shepstone

The Zulu War, Durban Mounted Volunteers under the Late Captain W Shepstone, setting out for the Front (engraving)
1106533 The Zulu War, Durban Mounted Volunteers under the Late Captain W Shepstone, setting out for the Front (engraving) by English School

Background imageAnglo Zulu War Collection: The Zulu War, Rourkes Drift, near the Scene of the Recent Conflict (engraving)

The Zulu War, Rourkes Drift, near the Scene of the Recent Conflict (engraving)
1106532 The Zulu War, Rourkes Drift, near the Scene of the Recent Conflict (engraving) by English School, (19th century); Private Collection; (add.info.: The Zulu War, Rourkes Drift)

Background imageAnglo Zulu War Collection: The Zulu War in South Africa, Cetewayo, the Zulu King (engraving)

The Zulu War in South Africa, Cetewayo, the Zulu King (engraving)
1106530 The Zulu War in South Africa, Cetewayo, the Zulu King (engraving) by Overend, William Heysham (1851-98) (after); Private Collection; (add.info.: The Zulu War in South Africa, Cetewayo)

Background imageAnglo Zulu War Collection: The Zulu War, Return of the Ambassadors from Cetewayo to Lord Chelmsford (engraving)

The Zulu War, Return of the Ambassadors from Cetewayo to Lord Chelmsford (engraving)
1099725 The Zulu War, Return of the Ambassadors from Cetewayo to Lord Chelmsford (engraving) by Prior, Melton (1845-1910) (after); Private Collection; (add.info.: The Zulu War)

Background imageAnglo Zulu War Collection: A Zulu Scout (engraving)

A Zulu Scout (engraving)
1099680 A Zulu Scout (engraving) by Woodville, Richard Caton II (1856-1927) (after); Private Collection; (add.info.: A Zulu Scout)

Background imageAnglo Zulu War Collection: Defence of Rorkes Drift, 1879 (gravure)

Defence of Rorkes Drift, 1879 (gravure)
959897 Defence of Rorkes Drift, 1879 (gravure) by Dupray, Henri-Louis (1841-1909); Private Collection; (add.info.: Defence of Rorkes Drift, Zululand, 1879)

Background imageAnglo Zulu War Collection: The Zulu War, Lancers returning from Burning Kraals (engraving)

The Zulu War, Lancers returning from Burning Kraals (engraving)
1099742 The Zulu War, Lancers returning from Burning Kraals (engraving) by English School, (19th century); Private Collection; (add.info.: The Zulu War, Lancers returning from Burning Kraals)

Background imageAnglo Zulu War Collection: The Zulu War, Facsimile of Envelope inclosing Letter from Ketchwayo (Cetewayo) (engraving)

The Zulu War, Facsimile of Envelope inclosing Letter from Ketchwayo (Cetewayo) (engraving)
1099724 The Zulu War, Facsimile of Envelope inclosing Letter from Ketchwayo (Cetewayo) (engraving) by English School, (19th century); Private Collection; (add.info.: The Zulu War)

Background imageAnglo Zulu War Collection: The Zulu War (engraving)

The Zulu War (engraving)
1099722 The Zulu War (engraving) by English School, (19th century); Private Collection; (add.info.: The Zulu War. Illustration for The Illustrated London News)


All Professionally Made to Order for Quick Shipping

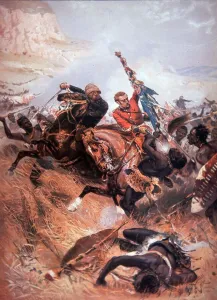
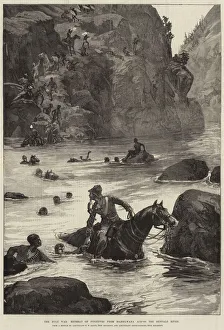
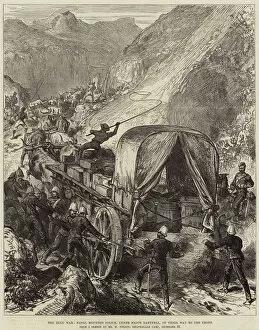
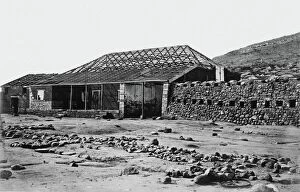
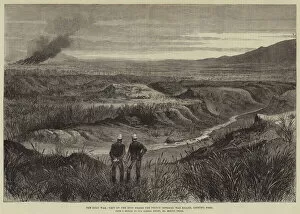
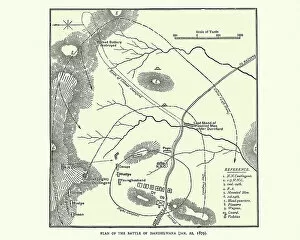
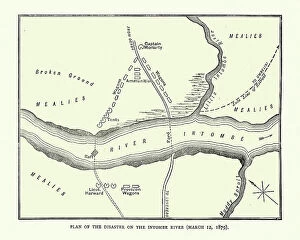
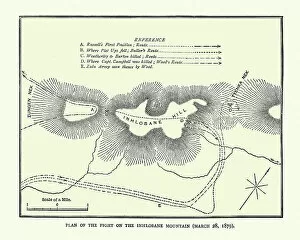
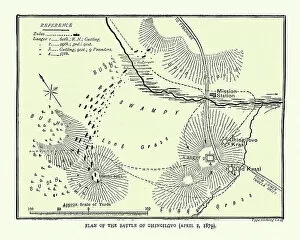
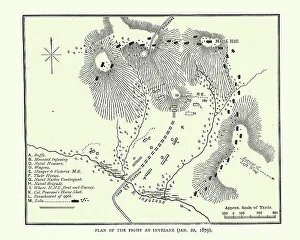
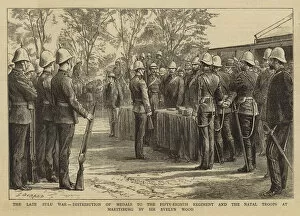
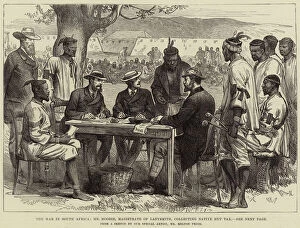
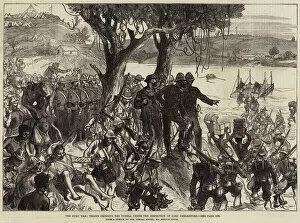
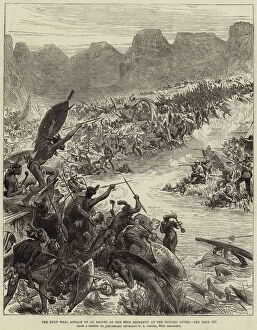
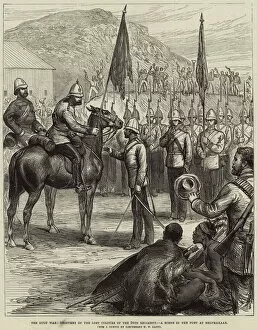
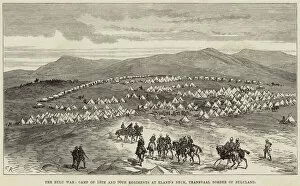
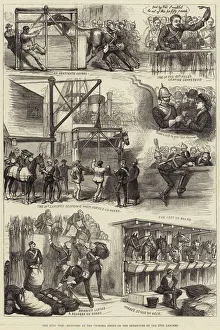
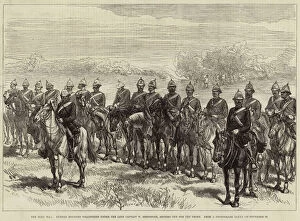
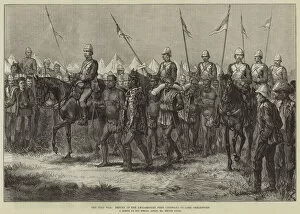
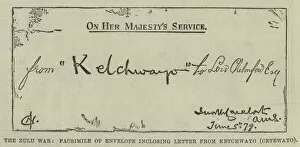
"The Anglo-Zulu War: A Glimpse into the Battlefields and Heroes" The Zulu War, Retreat of Fugitives from Isanhlwana across the Buffalo River (engraving): In a desperate bid for survival, fleeing soldiers navigate treacherous waters as they escape the blood-soaked fields of Isandlwana. The haunting image captures their harrowing journey across the Buffalo River. The Zulu War, Fugitives Drift, Buffalo River, with the Stone to which Lieutenant Melvill clung (engraving): Amidst chaos and carnage, Lieutenant Melvill's determination shines through as he clings onto a stone in the raging river. This engraving immortalizes his bravery during one of history's most intense conflicts. Plan of the Defence of Rorke's Drift, Anglo-Zulu War: Strategically mapped out defenses at Rorke's Drift reveal meticulous planning by British forces. This blueprint showcases their valiant efforts to hold off wave after wave of Zulu warriors in an epic battle that would go down in history. Saving the Queens Colour at the Battle of Isandlwana (colour litho): A moment frozen in time depicts a courageous soldier risking everything to save Queen Victoria's Color amidst utter chaos on Isandlwana battlefield. This vivid lithograph pays tribute to those who fought relentlessly against overwhelming odds. The Zulu War, Natal Mounted Police under Major Dartnell on their Way to the Front (engraving): Mounted police gallop towards destiny as they join fellow comrades on their way to confront mighty Zulu warriors. Their steely determination is palpable in this powerful engraving capturing their journey towards war-torn lands. Front view of Storehouse at Rorkes Drift, Buffalo River c. 1879 (b/w photo): This black-and-white photograph offers a glimpse into daily life at Rorke's Drift, where soldiers found solace amidst the chaos.