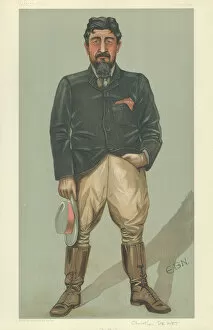
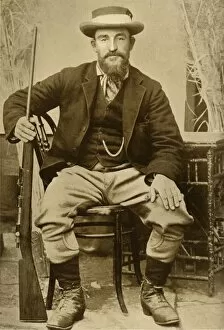
Fraud Blocker Skip to main content

De Wet Collection

"De Wet

Background imageDe Wet Collection: Colonial Gallantry in South Africa, the New Zealanders Brilliant Defence near Holspruit

Colonial Gallantry in South Africa, the New Zealanders Brilliant Defence near Holspruit, 25 February (litho)
1629879 Colonial Gallantry in South Africa, the New Zealanders Brilliant Defence near Holspruit, 25 February (litho) by Stewart

Background imageDe Wet Collection: In Pursuit of De Wet (litho)

In Pursuit of De Wet (litho)
1600437 In Pursuit of De Wet (litho) by Stewart, Allan (1865-1951); Private Collection; (add.info.: In Pursuit of De Wet, the 9th Lancers on the March, Troopers walking to save their Horses)

Background imageDe Wet Collection: Tommys Dinner, An Unlooked-for Stroke of Luck during the Pursuit of De Wet (litho)

Tommys Dinner, An Unlooked-for Stroke of Luck during the Pursuit of De Wet (litho)
1039953 Tommys Dinner, An Unlooked-for Stroke of Luck during the Pursuit of De Wet (litho) by Dadd, Frank (1851-1929) (after); Private Collection; (add.info.: Tommys Dinner)

Background imageDe Wet Collection: A 'Mobile Column'in South Africa, is this why De Wet was not caught? (litho)

A "Mobile Column"in South Africa, is this why De Wet was not caught? (litho)
1037400 A " Mobile Column" in South Africa, is this why De Wet was not caught? (litho) by Boyd, Alexander Stuart (1854-1930); Private Collection; (add.info)

Background imageDe Wet Collection: The Capture of De Wets Convoy at Reitz, 6 June, the Attack upon the Boer Wagons by Colonel De

The Capture of De Wets Convoy at Reitz, 6 June, the Attack upon the Boer Wagons by Colonel De Lisles Force (litho)
1628832 The Capture of De Wets Convoy at Reitz, 6 June, the Attack upon the Boer Wagons by Colonel De Lisles Force (litho) by Woodville

Background imageDe Wet Collection: The Scene of De Wets Earlier Operations, Retiefs Nek and the Adjacent Passes from Bethlehem

The Scene of De Wets Earlier Operations, Retiefs Nek and the Adjacent Passes from Bethlehem (b / w photo)
1600153 The Scene of De Wets Earlier Operations, Retiefs Nek and the Adjacent Passes from Bethlehem (b/w photo) by English Photographer

Background imageDe Wet Collection: The War in South Africa (b / w photo)

The War in South Africa (b / w photo)
1599710 The War in South Africa (b/w photo) by English Photographer, (20th century); Private Collection; (add.info.: The War in South Africa)

Background imageDe Wet Collection: A Stern Chase and a Long One, Imperial Yeomanry cutting off the Rear of De Wets Convoy (engraving)

A Stern Chase and a Long One, Imperial Yeomanry cutting off the Rear of De Wets Convoy (engraving)
1593426 A Stern Chase and a Long One, Imperial Yeomanry cutting off the Rear of De Wets Convoy (engraving) by Woodville, Richard Caton II (1856-1927) (after); Private Collection; (add.info)

Background imageDe Wet Collection: The South African War, Campaigning, and after (b / w photo)

The South African War, Campaigning, and after (b / w photo)
1600595 The South African War, Campaigning, and after (b/w photo) by English Photographer, (20th century); Private Collection; (add.info.: The South African War, Campaigning, and after)

Background imageDe Wet Collection: De Wets Pursuer, General Charles E Knox (b / w photo)

De Wets Pursuer, General Charles E Knox (b / w photo)
1600450 De Wets Pursuer, General Charles E Knox (b/w photo) by English Photographer, (20th century); Private Collection; (add.info.: De Wets Pursuer, General Charles E Knox)

Background imageDe Wet Collection: The Guerilla Warfare in South Africa (engraving)

The Guerilla Warfare in South Africa (engraving)
1593204 The Guerilla Warfare in South Africa (engraving) by Wright, Henry Charles Seppings (1850-1937); Private Collection; (add.info.: The Guerilla Warfare in South Africa)

Background imageDe Wet Collection: In Pursuit of De Wet, the Engagement at Baartmans Siding, North of De Aar (litho)

In Pursuit of De Wet, the Engagement at Baartmans Siding, North of De Aar (litho)
1040492 In Pursuit of De Wet, the Engagement at Baartmans Siding, North of De Aar (litho) by Nash, Joseph (d.1922); Private Collection; (add.info.: In Pursuit of De Wet)

Background imageDe Wet Collection: In Pursuit of De Wet, Artillery crossing the Drift at Kareepoort (litho)

In Pursuit of De Wet, Artillery crossing the Drift at Kareepoort (litho)
1040479 In Pursuit of De Wet, Artillery crossing the Drift at Kareepoort (litho) by Charlton, John (1849-1917) (after); Private Collection; (add.info.: In Pursuit of De Wet)

Background imageDe Wet Collection: General Christian De Wet (colour litho)

General Christian De Wet (colour litho)
612643 General Christian De Wet (colour litho) by English School, (20th century); Private Collection; (add.info.: General Christian De Wet, De Wet, 31 July 1902, Vanity Fair, cartoon)

Background imageDe Wet Collection: General Ben Viljoen delivering his Lecture on the Boer War, at Queens Hall, 16 October (litho)

General Ben Viljoen delivering his Lecture on the Boer War, at Queens Hall, 16 October (litho)
1601153 General Ben Viljoen delivering his Lecture on the Boer War, at Queens Hall, 16 October (litho) by Loye, Charles Auguste (Montbard) (1841-1905); Private Collection; (add.info)

Background imageDe Wet Collection: The Guerilla Warfare in South Africa (litho)

The Guerilla Warfare in South Africa (litho)
1593202 The Guerilla Warfare in South Africa (litho) by Prior, Melton (1845-1910) (after); Private Collection; (add.info.: The Guerilla Warfare in South Africa)

Background imageDe Wet Collection: Captured by De Wet, Scenes in the Guerilla Leaders Camp (b / w photo)

Captured by De Wet, Scenes in the Guerilla Leaders Camp (b / w photo)
1600060 Captured by De Wet, Scenes in the Guerilla Leaders Camp (b/w photo) by English Photographer, (20th century); Private Collection; (add.info.: Captured by De Wet)

Background imageDe Wet Collection: Captured by De Wet, the Yeomanry Hospital taken at Roodeval by the Boers (b / w photo)

Captured by De Wet, the Yeomanry Hospital taken at Roodeval by the Boers (b / w photo)
1600059 Captured by De Wet, the Yeomanry Hospital taken at Roodeval by the Boers (b/w photo) by English Photographer, (20th century); Private Collection; (add.info.: Captured by De Wet)

Background imageDe Wet Collection: The War in South Africa, De Wets Field of Operations (engraving)

The War in South Africa, De Wets Field of Operations (engraving)
1600592 The War in South Africa, De Wets Field of Operations (engraving) by Holland Tringham, Joseph (1861-1908); Private Collection; (add.info.: The War in South Africa, De Wets Field of Operations)

Background imageDe Wet Collection: The Guerilla Warfare in South Africa, De Wets Night Surprise of the British Camp at Tweefontein

The Guerilla Warfare in South Africa, De Wets Night Surprise of the British Camp at Tweefontein on 24 December (litho)
1629885 The Guerilla Warfare in South Africa, De Wets Night Surprise of the British Camp at Tweefontein on 24 December (litho) by Woodville

Background imageDe Wet Collection: De Wets Attempt to Cross the Railway, 1902. Creator: Unknown

De Wets Attempt to Cross the Railway, 1902. Creator: Unknown
De Wets Attempt to Cross the Railway, 1902. De Wets troops attempt to cross a railway line in Orange River Colony under fire from British troops in a blockhouse

Background imageDe Wet Collection: The Capture of De Wets Convoy at Reitz, June 6, 1901, 1902

The Capture of De Wets Convoy at Reitz, June 6, 1901, 1902. Attack on Boer waggons by Colonel De Lisles Force.. From " South Africa and the Transvaal War, Vol. VII", by Louis Creswicke

Background imageDe Wet Collection: The Reddersburg Mishap: Men of the Irish Rifles and Mounted Infantry Delivering Up Their Arms

The Reddersburg Mishap: Men of the Irish Rifles and Mounted Infantry Delivering Up Their Arms, 1901. Troops led by General Christiaan de Wet attacked a convoy of 600 of the Royal Irish Rifles

Background imageDe Wet Collection: De Wet, 1901. Creator: Unknown

De Wet, 1901. Creator: Unknown
De Wet, 1901. Christiaan de Wet (1854-1922) Boer general, rebel leader and politician planned the surprise attack on Sannas Post followerd by victory at Reddersburg

Background imageDe Wet Collection: Boer commanders, South Africa, Boer War, 1902. Artist: Underwood & Underwood

Boer commanders, South Africa, Boer War, 1902. Artist: Underwood & Underwood
Boer commanders, South Africa, Boer War, 1902. Ex-Commandant Generals Christiaan de Wet (1854-1922), Koos de la Rey (1837-1914) and Louis Botha (1862-1919)

Background imageDe Wet Collection: Boer War, 1899-1902

Boer War, 1899-1902. Boer commander Christiaan Rudolf de Wet attempting to lead a column across a railway at night past an armoured train and blockhouse

Background imageDe Wet Collection: Attack on the British encampment at Tweefontein, South Africa, Boer War, 1901 (1902)

Attack on the British encampment at Tweefontein, South Africa, Boer War, 1901 (1902)
Attack on the British encampment at Tweefontein, South Africa, Boer War, 1901(1902). Boer forces under General de Wet surprised an encampment of British soldiers at Tweefontein on 25 December 1901

Background imageDe Wet Collection: Christiaan de Wet, Boer soldier and politician, c1900

Christiaan de Wet, Boer soldier and politician, c1900. De Wet (1854-1922) commanded the forces of the Orange Free State during the Second Boer War (1899-1902)

Background imageDe Wet Collection: Christiaan De Wet, Afrikaner soldier, politician and big game hunter, c1899

Christiaan De Wet, Afrikaner soldier, politician and big game hunter, c1899. De Wet (1854-1922) addressing burghers near Ventersdorp Station

Background imageDe Wet Collection: Christiaan Rudolf de Wet, 1854 - 1922. Boer general, rebel leader and politician

Christiaan Rudolf de Wet, 1854 - 1922. Boer general, rebel leader and politician. From The Pageant of the Century, published 1934


All Professionally Made to Order for Quick Shipping

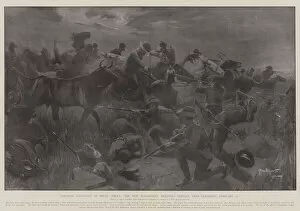
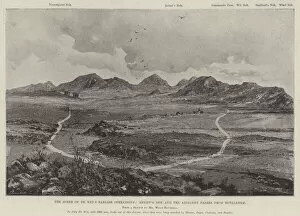
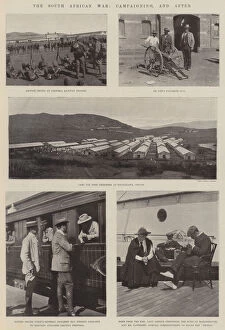
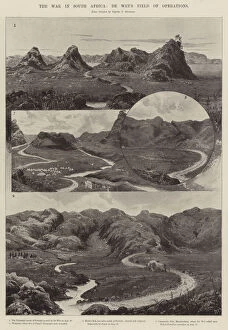
"De Wet: A Legendary Figure in South African Colonial History" Step back in time to witness the colonial gallantry in South Africa as we delve into the remarkable exploits of De Wet. From his elusive maneuvers to the New Zealanders' brilliant defense near Holspruit, 25 February, this litho captures the essence of a captivating era. Join us on an exhilarating pursuit through lithographs that depict his cunning escapades. "In Pursuit of De Wet" showcases his ability to outwit and outmaneuver his adversaries, leaving them astounded by his audacity. Amidst the chaos, fortune favors Tommy's dinner with an unlooked-for stroke of luck during the pursuit of De Wet. This litho portrays a momentary respite amidst relentless chasing and highlights how chance can sway fate on the battlefield. Contemplate whether a "Mobile Column" played a role in why De Wet remained uncaptured through another intriguing lithograph. Explore how this strategic advantage allowed him to evade capture time and again, confounding even seasoned generals. Witness one pivotal event - The Capture of De Wets Convoy at Reitz, 6 June - where Colonel De Lisles Force attacks Boer wagons head-on. This dramatic scene immortalizes their daring assault against overwhelming odds and showcases their unwavering determination. Retiefs Nek and adjacent passes from Bethlehem come alive through a black-and-white photo showcasing scenes from earlier operations led by De Wet himself. These images provide insight into the harsh realities faced during those tumultuous times. The war in South Africa unfolds before your eyes through evocative black-and-white photos capturing both campaigning and its aftermath. Experience firsthand the struggles endured by soldiers on both sides as they fought for their beliefs amidst unforgiving landscapes. Immerse yourself in history as you witness Imperial Yeomanry cutting off the rear of De Wets convoy through an engraving titled "A Stern Chase and a Long One.