Fraud Blocker Skip to main content

Hereward The Outlaw Collection

"Hereward the Outlaw: A Tale of Courage and Deception" In the thrilling saga of Hereward the Outlaw

Background imageHereward The Outlaw Collection: How Hereward departed from Ely, and how he killed the mare, Swallow

How Hereward departed from Ely, and how he killed the mare, Swallow, illustration from Hereward the Great by Charles
STC400817 How Hereward departed from Ely, and how he killed the mare, Swallow, illustration from Hereward the Great by Charles Kingsley, pub. 1870, engraved by C.G

Background imageHereward The Outlaw Collection: How Hereward got the rest of his souls price, illustration from Hereward the Great by Charles

How Hereward got the rest of his souls price, illustration from Hereward the Great by Charles Kingsley, pub
STC400819 How Hereward got the rest of his souls price, illustration from Hereward the Great by Charles Kingsley, pub. 1870, engraved by C.G

Background imageHereward The Outlaw Collection: How Hereward played the potter and cheated the King, illustration from Hereward the Great

How Hereward played the potter and cheated the King, illustration from Hereward the Great
STC400816 How Hereward played the potter and cheated the King, illustration from Hereward the Great by Charles Kingsley, pub. 1870, engraved by C.G

Background imageHereward The Outlaw Collection: How Torfrida teaches Hereward to pray, illustration from Hereward the Great by Charles

How Torfrida teaches Hereward to pray, illustration from Hereward the Great by Charles
STC400813 How Torfrida teaches Hereward to pray, illustration from Hereward the Great by Charles Kingsley, pub. 1870, engraved by C.G

Background imageHereward The Outlaw Collection: Alftruda recognises Hereward, illustration from Hereward the Great by Charles Kingsley

Alftruda recognises Hereward, illustration from Hereward the Great by Charles Kingsley
STC400811 Alftruda recognises Hereward, illustration from Hereward the Great by Charles Kingsley, pub. 1870, engraved by C.G

Background imageHereward The Outlaw Collection: How Hereward enters the consecrated fortress of St. Bertin

How Hereward enters the consecrated fortress of St. Bertin
STC400808 How Hereward enters the consecrated fortress of St. Bertin, illustration from Hereward the Great by Charles Kingsley, pub. 1870, engraved by C.G

Background imageHereward The Outlaw Collection: Hereward informs his uncle the Prior that he is about to be outlawed

Hereward informs his uncle the Prior that he is about to be outlawed
STC400803 Hereward informs his uncle the Prior that he is about to be outlawed, illustration from Hereward the Great by Charles Kingsley, pub. 1870, engraved by C.G

Background imageHereward The Outlaw Collection: Martin Lightfoot undertakes to be the bearer of the letter to Earl Leofric

Martin Lightfoot undertakes to be the bearer of the letter to Earl Leofric
STC400801 Martin Lightfoot undertakes to be the bearer of the letter to Earl Leofric, illustration from Hereward the Great by Charles Kingsley, pub. 1870, engraved by C.G

Background imageHereward The Outlaw Collection: How Hereward came in to the King, illustration from Hereward the Great by Charles

How Hereward came in to the King, illustration from Hereward the Great by Charles
STC400818 How Hereward came in to the King, illustration from Hereward the Great by Charles Kingsley, pub. 1870, engraved by C.G

Background imageHereward The Outlaw Collection: How Hereward cleared Bourne of Frenchmen, illustration from Hereward the Great by Charles

How Hereward cleared Bourne of Frenchmen, illustration from Hereward the Great by Charles
STC400812 How Hereward cleared Bourne of Frenchmen, illustration from Hereward the Great by Charles Kingsley, pub. 1870, engraved by C.G

Background imageHereward The Outlaw Collection: How Hereward runs his ship upon the Flanders shore, illustration from Hereward the Great

How Hereward runs his ship upon the Flanders shore, illustration from Hereward the Great
STC400807 How Hereward runs his ship upon the Flanders shore, illustration from Hereward the Great by Charles Kingsley, pub. 1870, engraved by C.G

Background imageHereward The Outlaw Collection: How Hereward was caught in a trap, illustration from Hereward the Great by Charles

How Hereward was caught in a trap, illustration from Hereward the Great by Charles
STC400806 How Hereward was caught in a trap, illustration from Hereward the Great by Charles Kingsley, pub. 1870, engraved by C.G

Background imageHereward The Outlaw Collection: Hereward guards Alftruda to a place of safety, illustration from Hereward the Great by

Hereward guards Alftruda to a place of safety, illustration from Hereward the Great by
STC400815 Hereward guards Alftruda to a place of safety, illustration from Hereward the Great by Charles Kingsley, pub. 1870, engraved by C.G

Background imageHereward The Outlaw Collection: How Hereward rescues Alftruda, illustration from Hereward the Great by Charles Kingsley

How Hereward rescues Alftruda, illustration from Hereward the Great by Charles Kingsley
STC400814 How Hereward rescues Alftruda, illustration from Hereward the Great by Charles Kingsley, pub. 1870, engraved by C.G

Background imageHereward The Outlaw Collection: How Hereward slew the bear, illustration from Hereward the Great by Charles Kingsley, pub

How Hereward slew the bear, illustration from Hereward the Great by Charles Kingsley, pub
STC400805 How Hereward slew the bear, illustration from Hereward the Great by Charles Kingsley, pub. 1870, engraved by C.G

Background imageHereward The Outlaw Collection: Herewards interview with his mother and the priest Herluin

Herewards interview with his mother and the priest Herluin
STC400800 Herewards interview with his mother and the priest Herluin, illustration from Hereward the Great by Charles Kingsley, pub. 1870, engraved by C.G

Background imageHereward The Outlaw Collection: How Hereward turned Berserker, illustration from Hereward the Great by Charles Kingsley

How Hereward turned Berserker, illustration from Hereward the Great by Charles Kingsley
STC400810 How Hereward turned Berserker, illustration from Hereward the Great by Charles Kingsley, pub. 1870, engraved by C.G

Background imageHereward The Outlaw Collection: Herewards first interview with Torfrida, illustration from Hereward the Great by

Herewards first interview with Torfrida, illustration from Hereward the Great by
STC400809 Herewards first interview with Torfrida, illustration from Hereward the Great by Charles Kingsley, pub. 1870, engraved by C.G

Background imageHereward The Outlaw Collection: How Martin Lightfoot over-takes Hereward, illustration from Hereward the Great by Charles

How Martin Lightfoot over-takes Hereward, illustration from Hereward the Great by Charles
STC400804 How Martin Lightfoot over-takes Hereward, illustration from Hereward the Great by Charles Kingsley, pub. 1870, engraved by C.G

Background imageHereward The Outlaw Collection: Hereward sees Martin Lightfoot depart with the letter, illustration from Hereward

Hereward sees Martin Lightfoot depart with the letter, illustration from Hereward
STC400802 Hereward sees Martin Lightfoot depart with the letter, illustration from Hereward the Great by Charles Kingsley, pub. 1870, engraved by C.G


All Professionally Made to Order for Quick Shipping

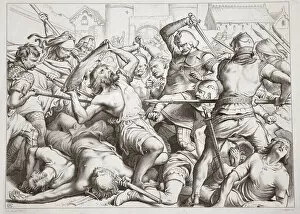
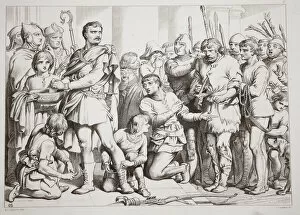
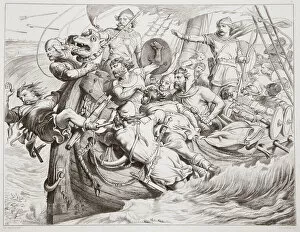
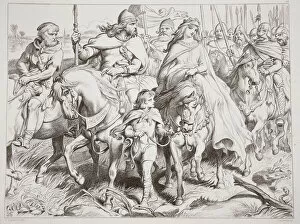
"Hereward the Outlaw: A Tale of Courage and Deception" In the thrilling saga of Hereward the Outlaw, we witness his daring escapades and cunning strategies that have made him a legendary figure. Departing from Ely, he embarks on a treacherous journey filled with unexpected twists and turns. One pivotal moment captures our attention as Hereward kills his trusted mare, Swallow. This haunting illustration by Charles Kingsley depicts the sacrifice required for survival in a world where loyalty is scarce. As Hereward seeks to secure his freedom, another gripping scene unfolds when he obtains the rest of his souls price. The engraving by C. G. Lewis showcases Hereward's relentless pursuit of justice and retribution against those who wronged him. But it is not just vengeance that drives this enigmatic hero; he also possesses an uncanny ability to outsmart even the most powerful adversaries. In one instance, Hereward plays the potter and cheats the King himself – a testament to his resourcefulness and audacity. Amidst all these trials, Torfrida emerges as both a love interest and mentor to our protagonist. Through her guidance, she teaches Hereward how to find solace in prayer amidst chaos - an invaluable lesson for someone constantly battling against overwhelming odds. The story takes an intriguing turn when Alftruda recognizes Hereward despite his outlaw status. This captivating illustration reveals their complicated relationship fraught with secrets and hidden agendas. Undeterred by danger or consecrated fortresses like St. Bertin, Hereward fearlessly infiltrates enemy territory time after time – defying all expectations placed upon him. Even in moments of imminent peril, such as when Martin Lightfoot undertakes delivering crucial letters or when caught in traps set by foes seeking revenge – our hero never falters but instead rises above adversity with unwavering determination. Ultimately, it is through sheer grit that Hereward confronts the King himself, as depicted in another striking illustration.