Fraud Blocker Skip to main content

The Mersey Tunnel Collection

"Unveiling the Hidden Marvels

Background imageThe Mersey Tunnel Collection: Mersey Tunnel: Plastering of the Main Arch (b / w photo)

Mersey Tunnel: Plastering of the Main Arch (b / w photo)
6022577 Mersey Tunnel: Plastering of the Main Arch (b/w photo) by English Photographer, (20th century); Private Collection; (add.info.: Plastering of the Main Arch)

Background imageThe Mersey Tunnel Collection: Mersey Tunnel: Reinforced Roadway ready for Concreting (b / w photo)

Mersey Tunnel: Reinforced Roadway ready for Concreting (b / w photo)
6022564 Mersey Tunnel: Reinforced Roadway ready for Concreting (b/w photo) by English Photographer, (20th century); Private Collection; (add.info.: Reinforced Roadway ready for Concreting)

Background imageThe Mersey Tunnel Collection: Mersey Tunnel: Roadway Construction under Land Portions of Main Tunnel (b / w photo)

Mersey Tunnel: Roadway Construction under Land Portions of Main Tunnel (b / w photo)
6022562 Mersey Tunnel: Roadway Construction under Land Portions of Main Tunnel (b/w photo) by English Photographer, (20th century); Private Collection; (add.info)

Background imageThe Mersey Tunnel Collection: Mersey Tunnel: Roadway Construction in one of the Junction Chambers (b / w photo)

Mersey Tunnel: Roadway Construction in one of the Junction Chambers (b / w photo)
6022560 Mersey Tunnel: Roadway Construction in one of the Junction Chambers (b/w photo) by English Photographer, (20th century); Private Collection; (add.info)

Background imageThe Mersey Tunnel Collection: The Mersey Tunnel Entrance, Kings Square, Birkenhead (b / w photo)

The Mersey Tunnel Entrance, Kings Square, Birkenhead (b / w photo)
6022584 The Mersey Tunnel Entrance, Kings Square, Birkenhead (b/w photo) by English Photographer, (20th century); Private Collection; (add.info.: The Mersey Tunnel Entrance, Kings Square, Birkenhead)

Background imageThe Mersey Tunnel Collection: Mersey Tunnel: Cement Gunning completed (b / w photo)

Mersey Tunnel: Cement Gunning completed (b / w photo)
6022570 Mersey Tunnel: Cement Gunning completed (b/w photo) by English Photographer, (20th century); Private Collection; (add.info.: Cement Gunning completed)

Background imageThe Mersey Tunnel Collection: Mersey Tunnel: The Ventilating Stations (b / w photo)

Mersey Tunnel: The Ventilating Stations (b / w photo)
6022566 Mersey Tunnel: The Ventilating Stations (b/w photo) by English Photographer, (20th century); Private Collection; (add.info.: The Ventilating Stations)

Background imageThe Mersey Tunnel Collection: Mersey Tunnel: Excavation in one of the Junction Chambers (b / w photo)

Mersey Tunnel: Excavation in one of the Junction Chambers (b / w photo)
6022559 Mersey Tunnel: Excavation in one of the Junction Chambers (b/w photo) by English Photographer, (20th century); Private Collection; (add.info.: Excavation in one of the Junction Chambers)

Background imageThe Mersey Tunnel Collection: Mersey Tunnel: Cast-Iron Lining in Under-River Section of Main Tunnel (b / w photo)

Mersey Tunnel: Cast-Iron Lining in Under-River Section of Main Tunnel (b / w photo)
6022557 Mersey Tunnel: Cast-Iron Lining in Under-River Section of Main Tunnel (b/w photo) by English Photographer, (20th century); Private Collection; (add.info)

Background imageThe Mersey Tunnel Collection: Mersey Tunnel, Queensway (litho)

Mersey Tunnel, Queensway (litho)
6022548 Mersey Tunnel, Queensway (litho) by English School, (20th century); Private Collection; (add.info.: Mersey Tunnel, Queensway)

Background imageThe Mersey Tunnel Collection: The Mersey Tunnel, Mid-River Section (b / w photo)

The Mersey Tunnel, Mid-River Section (b / w photo)
6022579 The Mersey Tunnel, Mid-River Section (b/w photo) by English Photographer, (20th century); Private Collection; (add.info.: The Mersey Tunnel, Mid-River Section)

Background imageThe Mersey Tunnel Collection: Mersey Tunnel: Construction of the Rendel Street Branch Tunnel (b / w photo)

Mersey Tunnel: Construction of the Rendel Street Branch Tunnel (b / w photo)
6022576 Mersey Tunnel: Construction of the Rendel Street Branch Tunnel (b/w photo) by English Photographer, (20th century); Private Collection; (add.info)

Background imageThe Mersey Tunnel Collection: Mersey Tunnel: Fresh Air Ducts under the Roadway (b / w photo)

Mersey Tunnel: Fresh Air Ducts under the Roadway (b / w photo)
6022575 Mersey Tunnel: Fresh Air Ducts under the Roadway (b/w photo) by English Photographer, (20th century); Private Collection; (add.info.: Fresh Air Ducts under the Roadway)

Background imageThe Mersey Tunnel Collection: Mersey Tunnel: Fresh Air Duct in Main Tunnel under Land (b / w photo)

Mersey Tunnel: Fresh Air Duct in Main Tunnel under Land (b / w photo)
6022572 Mersey Tunnel: Fresh Air Duct in Main Tunnel under Land (b/w photo) by English Photographer, (20th century); Private Collection; (add.info.: Fresh Air Duct in Main Tunnel under Land)

Background imageThe Mersey Tunnel Collection: Mersey Tunnel: Preparation for Cement Gunning in the Main Tunnel (b / w photo)

Mersey Tunnel: Preparation for Cement Gunning in the Main Tunnel (b / w photo)
6022565 Mersey Tunnel: Preparation for Cement Gunning in the Main Tunnel (b/w photo) by English Photographer, (20th century); Private Collection; (add.info)

Background imageThe Mersey Tunnel Collection: Mersey Tunnel: The Completed Roadway in the Main Tunnel (b / w photo)

Mersey Tunnel: The Completed Roadway in the Main Tunnel (b / w photo)
6022563 Mersey Tunnel: The Completed Roadway in the Main Tunnel (b/w photo) by English Photographer, (20th century); Private Collection; (add.info.: The Completed Roadway in the Main Tunnel)

Background imageThe Mersey Tunnel Collection: Mersey Tunnel: Erection of Cast-Iron Lining (b / w photo)

Mersey Tunnel: Erection of Cast-Iron Lining (b / w photo)
6022547 Mersey Tunnel: Erection of Cast-Iron Lining (b/w photo) by English Photographer, (20th century); Private Collection; (add.info.: Erection of Cast-Iron Lining)

Background imageThe Mersey Tunnel Collection: Mersey Tunnel: The Main Tunnel showing Pilot Headings reinforced under Glacial Channel (b / w photo)

Mersey Tunnel: The Main Tunnel showing Pilot Headings reinforced under Glacial Channel (b / w photo)
6022546 Mersey Tunnel: The Main Tunnel showing Pilot Headings reinforced under Glacial Channel (b/w photo) by English Photographer

Background imageThe Mersey Tunnel Collection: Mersey Tunnel: Excavation of the Pilot Headings (b / w photo)

Mersey Tunnel: Excavation of the Pilot Headings (b / w photo)
6022540 Mersey Tunnel: Excavation of the Pilot Headings (b/w photo) by English Photographer, (20th century); Private Collection; (add.info.: Excavation of the Pilot Headings)

Background imageThe Mersey Tunnel Collection: Mersey Tunnel: The Completed Plastering (b / w photo)

Mersey Tunnel: The Completed Plastering (b / w photo)
6022578 Mersey Tunnel: The Completed Plastering (b/w photo) by English Photographer, (20th century); Private Collection; (add.info.: The Completed Plastering)

Background imageThe Mersey Tunnel Collection: Mersey Tunnel: The Ventilating Stations (b / w photo)

Mersey Tunnel: The Ventilating Stations (b / w photo)
6022567 Mersey Tunnel: The Ventilating Stations (b/w photo) by English Photographer, (20th century); Private Collection; (add.info.: The Ventilating Stations)

Background imageThe Mersey Tunnel Collection: Mersey Tunnel: Diagram of the Pilot Headings and Working Shafts (litho)

Mersey Tunnel: Diagram of the Pilot Headings and Working Shafts (litho)
6022558 Mersey Tunnel: Diagram of the Pilot Headings and Working Shafts (litho) by English School, (20th century); Private Collection; (add.info.: Diagram of the Pilot Headings and Working Shafts)

Background imageThe Mersey Tunnel Collection: Mersey Tunnel: Change-Over from Circular to Inverted Tunnel (b / w photo)

Mersey Tunnel: Change-Over from Circular to Inverted Tunnel (b / w photo)
6022554 Mersey Tunnel: Change-Over from Circular to Inverted Tunnel (b/w photo) by English Photographer, (20th century); Private Collection; (add.info.: Change-Over from Circular to Inverted Tunnel)

Background imageThe Mersey Tunnel Collection: Invert over the Mersey Railway Tunnel, Birkenhead (b / w photo)

Invert over the Mersey Railway Tunnel, Birkenhead (b / w photo)
6022552 Invert over the Mersey Railway Tunnel, Birkenhead (b/w photo) by English Photographer, (20th century); Private Collection; (add.info.: Invert over the Mersey Railway Tunnel, Birkenhead)

Background imageThe Mersey Tunnel Collection: Mersey Tunnel: Excavation and Erection of Steel Ribs in one of the 'Break ups'(b / w photo)

Mersey Tunnel: Excavation and Erection of Steel Ribs in one of the "Break ups"(b / w photo)
6022551 Mersey Tunnel: Excavation and Erection of Steel Ribs in one of the " Break ups" (b/w photo) by English Photographer

Background imageThe Mersey Tunnel Collection: Mersey Tunnel: Excavation of Lower Half of the Main Tunnel (b / w photo)

Mersey Tunnel: Excavation of Lower Half of the Main Tunnel (b / w photo)
6022550 Mersey Tunnel: Excavation of Lower Half of the Main Tunnel (b/w photo) by English Photographer, (20th century); Private Collection; (add.info.: Excavation of Lower Half of the Main Tunnel)

Background imageThe Mersey Tunnel Collection: The Mersey Tunnel (b / w photo)

The Mersey Tunnel (b / w photo)
6022545 The Mersey Tunnel (b/w photo) by English Photographer, (20th century); Private Collection; (add.info.: The Mersey Tunnel)

Background imageThe Mersey Tunnel Collection: The Mersey Tunnel Entrance, Kingsway, Liverpool (b / w photo)

The Mersey Tunnel Entrance, Kingsway, Liverpool (b / w photo)
6022543 The Mersey Tunnel Entrance, Kingsway, Liverpool (b/w photo) by English Photographer, (20th century); Private Collection; (add.info.: The Mersey Tunnel Entrance, Kingsway, Liverpool)

Background imageThe Mersey Tunnel Collection: Mersey Tunnel: Reinforcing Shield under Dale Street, Liverpool (b / w photo)

Mersey Tunnel: Reinforcing Shield under Dale Street, Liverpool (b / w photo)
6022574 Mersey Tunnel: Reinforcing Shield under Dale Street, Liverpool (b/w photo) by English Photographer, (20th century); Private Collection; (add.info.: Reinforcing Shield under Dale Street)

Background imageThe Mersey Tunnel Collection: Mersey Tunnel: An Outsize Load awaiting Convoy (b / w photo)

Mersey Tunnel: An Outsize Load awaiting Convoy (b / w photo)
6022573 Mersey Tunnel: An Outsize Load awaiting Convoy (b/w photo) by English Photographer, (20th century); Private Collection; (add.info.: An Outsize Load awaiting Convoy)

Background imageThe Mersey Tunnel Collection: Mersey Tunnel: Exhaust Receiver Chamber before Concreting (b / w photo)

Mersey Tunnel: Exhaust Receiver Chamber before Concreting (b / w photo)
6022571 Mersey Tunnel: Exhaust Receiver Chamber before Concreting (b/w photo) by English Photographer, (20th century); Private Collection; (add.info.: Exhaust Receiver Chamber before Concreting)

Background imageThe Mersey Tunnel Collection: Mersey Tunnel: Blowing Fan and Casing, Georges Dock Building, Liverpool (b / w photo)

Mersey Tunnel: Blowing Fan and Casing, Georges Dock Building, Liverpool (b / w photo)
6022569 Mersey Tunnel: Blowing Fan and Casing, Georges Dock Building, Liverpool (b/w photo) by English Photographer, (20th century); Private Collection; (add.info.: Blowing Fan and Casing)

Background imageThe Mersey Tunnel Collection: Mersey Tunnel: Contruction of Reinforced Concrete Roadway (b / w photo)

Mersey Tunnel: Contruction of Reinforced Concrete Roadway (b / w photo)
6022561 Mersey Tunnel: Contruction of Reinforced Concrete Roadway (b/w photo) by English Photographer, (20th century); Private Collection; (add.info.: Contruction of Reinforced Concrete Roadway)

Background imageThe Mersey Tunnel Collection: Mersey Tunnel: The Lined Upper Half of the Main Tunnel (b / w photo)

Mersey Tunnel: The Lined Upper Half of the Main Tunnel (b / w photo)
6022549 Mersey Tunnel: The Lined Upper Half of the Main Tunnel (b/w photo) by English Photographer, (20th century); Private Collection; (add.info.: The Lined Upper Half of the Main Tunnel)

Background imageThe Mersey Tunnel Collection: The Queensway Mersey Tunnel entrance, Liverpool, England 9th May 1934

The Queensway Mersey Tunnel entrance, Liverpool, England 9th May 1934 Picture shows work on the entrance to the tunnel, well on the way to being finished


All Professionally Made to Order for Quick Shipping

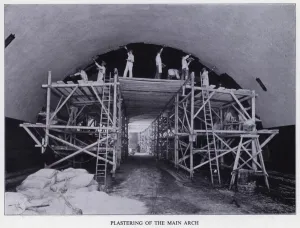
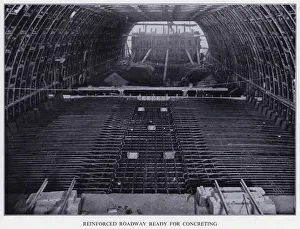
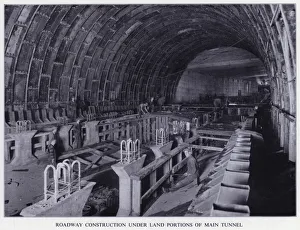
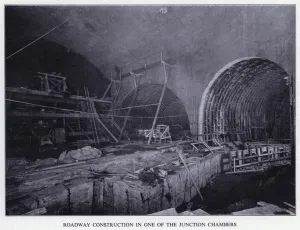
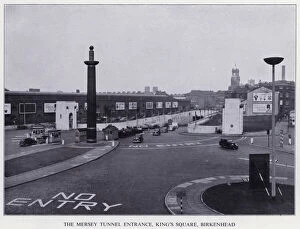
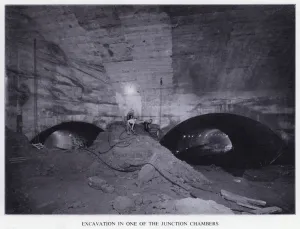
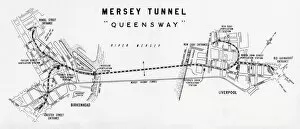
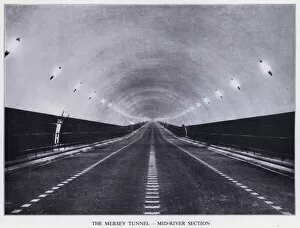
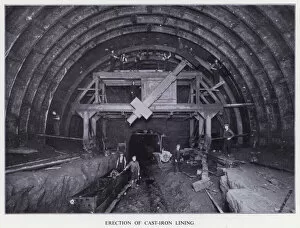
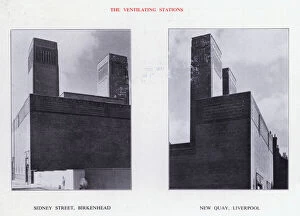
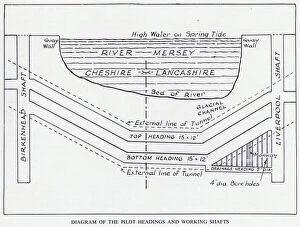
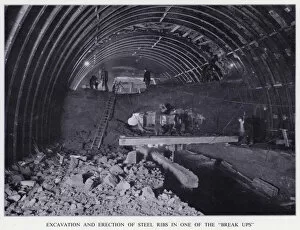
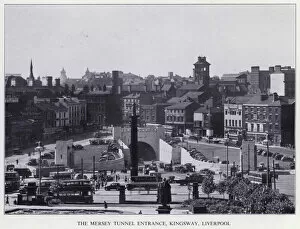
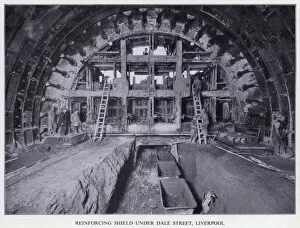
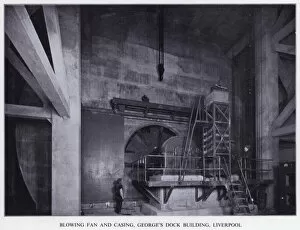
"Unveiling the Hidden Marvels: A Glimpse into the Mersey Tunnel's Remarkable Construction" Step back in time and witness the awe-inspiring construction of the iconic Mersey Tunnel. In this captivating collection of black and white photographs, we delve into the intricate process that brought this engineering marvel to life. First up, a mesmerizing shot captures workers meticulously plastering the main arch of the tunnel. Their skilled hands delicately smoothing every surface, ensuring a flawless finish that would stand against time. Moving forward, another image reveals a reinforced roadway eagerly awaiting its concrete embrace. The sheer strength beneath our feet is evident as layers upon layers are carefully laid down, forming an unyielding foundation for countless journeys yet to come. Venturing deeper underground, we glimpse at roadway construction beneath land portions of the main tunnel. A labyrinthine network taking shape under our very cities - a testament to human ingenuity and determination. Junction chambers become our next destination as we witness their creation unfold before our eyes. These interconnected spaces hold secrets untold; their purpose hidden within their walls until now. Stepping outside momentarily, we find ourselves at Kings Square in Birkenhead where one of many entrances to this subterranean world stands tall. An imposing structure beckoning travelers with promises of adventure on distant shores. Back inside, cement gunning marks yet another milestone reached in this monumental undertaking. The precision and expertise required are evident as each spray brings us closer to completion - inch by inch towards connectivity like never before. Ventilating stations emerge from darkness in striking monochrome hues - silent guardians ensuring fresh air flows freely through these man-made arteries deep below ground level. Their presence vital for both safety and comfort alike. As excavation continues within junction chambers, revealing hidden depths previously untouched by human hands, it becomes clear that no obstacle was too great for those who dared dream big enough to build such an extraordinary passage between two worlds.