Fraud Blocker Skip to main content

Transvaal Crisis Collection

"The Transvaal Crisis: A Tumultuous Time in South African History" Amidst the chaos and tension

Background imageTransvaal Crisis Collection: The Transvaal Crisis, how the Boers practise Shooting (litho)

The Transvaal Crisis, how the Boers practise Shooting (litho)
1593127 The Transvaal Crisis, how the Boers practise Shooting (litho) by Hurst, Hal (b.1865); Private Collection; (add.info.: The Transvaal Crisis, how the Boers practise Shooting)

Background imageTransvaal Crisis Collection: The Transvaal Crisis, off to the Cape (litho)

The Transvaal Crisis, off to the Cape (litho)
1592738 The Transvaal Crisis, off to the Cape (litho) by Begg, Samuel (fl.1886-1916) (after); Private Collection; (add.info.: The Transvaal Crisis, off to the Cape)

Background imageTransvaal Crisis Collection: The Transvaal Crisis, Scenes in Johannesburg (litho)

The Transvaal Crisis, Scenes in Johannesburg (litho)
1041918 The Transvaal Crisis, Scenes in Johannesburg (litho) by Dadd, Frank (1851-1929) (after); Private Collection; (add.info.: The Transvaal Crisis, Scenes in Johannesburg)

Background imageTransvaal Crisis Collection: The Transvaal Crisis (litho)

The Transvaal Crisis (litho)
1041914 The Transvaal Crisis (litho) by Dadd, Frank (1851-1929) (after); Private Collection; (add.info.: The Transvaal Crisis)

Background imageTransvaal Crisis Collection: The Transvaal Crisis (litho)

The Transvaal Crisis (litho)
1592741 The Transvaal Crisis (litho) by Wright, Henry Charles Seppings (1850-1937); Private Collection; (add.info.: The Transvaal Crisis)

Background imageTransvaal Crisis Collection: The Transvaal Crisis, Troops for the Cape (b / w photo)

The Transvaal Crisis, Troops for the Cape (b / w photo)
1592700 The Transvaal Crisis, Troops for the Cape (b/w photo) by English Photographer, (19th century); Private Collection; (add.info.: The Transvaal Crisis, Troops for the Cape)

Background imageTransvaal Crisis Collection: The Transvaal Crisis, Movements of the Imperial Troops (litho)

The Transvaal Crisis, Movements of the Imperial Troops (litho)
1592646 The Transvaal Crisis, Movements of the Imperial Troops (litho) by English School, (19th century); Private Collection; (add.info.: The Transvaal Crisis, Movements of the Imperial Troops)

Background imageTransvaal Crisis Collection: The Transvaal Crisis, Scenes in and about Pretoria (litho)

The Transvaal Crisis, Scenes in and about Pretoria (litho)
1592626 The Transvaal Crisis, Scenes in and about Pretoria (litho) by Wright, Henry Charles Seppings (1850-1937); Private Collection; (add.info.: The Transvaal Crisis, Scenes in and about Pretoria)

Background imageTransvaal Crisis Collection: The Transvaal Crisis (b / w photo)

The Transvaal Crisis (b / w photo)
1592548 The Transvaal Crisis (b/w photo) by English Photographer, (19th century); Private Collection; (add.info.: The Transvaal Crisis. Illustration for The Illustrated London News, 2 September 1899)

Background imageTransvaal Crisis Collection: The Transvaal Crisis, Troops for the Cape (b / w photo)

The Transvaal Crisis, Troops for the Cape (b / w photo)
1592739 The Transvaal Crisis, Troops for the Cape (b/w photo) by English Photographer, (19th century); Private Collection; (add.info.: The Transvaal Crisis, Troops for the Cape)

Background imageTransvaal Crisis Collection: The Transvaal Crisis, Troops for the Cape (b / w photo)

The Transvaal Crisis, Troops for the Cape (b / w photo)
1592730 The Transvaal Crisis, Troops for the Cape (b/w photo) by English Photographer, (19th century); Private Collection; (add.info.: The Transvaal Crisis, Troops for the Cape)

Background imageTransvaal Crisis Collection: The Transvaal Crisis, Troops for the Cape (engraving)

The Transvaal Crisis, Troops for the Cape (engraving)
1592712 The Transvaal Crisis, Troops for the Cape (engraving) by English School, (19th century); Private Collection; (add.info.: The Transvaal Crisis, Troops for the Cape)

Background imageTransvaal Crisis Collection: The Transvaal Crisis, Departure of Troops from Aldershot and Southampton (b / w photo)

The Transvaal Crisis, Departure of Troops from Aldershot and Southampton (b / w photo)
1592650 The Transvaal Crisis, Departure of Troops from Aldershot and Southampton (b/w photo) by English Photographer, (19th century); Private Collection; (add.info.: The Transvaal Crisis)

Background imageTransvaal Crisis Collection: The Transvaal Crisis, Scenes on the Boundary (litho)

The Transvaal Crisis, Scenes on the Boundary (litho)
1592649 The Transvaal Crisis, Scenes on the Boundary (litho) by Wright, Henry Charles Seppings (1850-1937); Private Collection; (add.info.: The Transvaal Crisis, Scenes on the Boundary)

Background imageTransvaal Crisis Collection: The Transvaal Crisis, Scenes in South Africa (b / w photo)

The Transvaal Crisis, Scenes in South Africa (b / w photo)
1592647 The Transvaal Crisis, Scenes in South Africa (b/w photo) by English Photographer, (19th century); Private Collection; (add.info.: The Transvaal Crisis, Scenes in South Africa)

Background imageTransvaal Crisis Collection: The Transvaal Crisis, British Troops for South African Service (b / w photo)

The Transvaal Crisis, British Troops for South African Service (b / w photo)
1592620 The Transvaal Crisis, British Troops for South African Service (b/w photo) by English Photographer, (19th century); Private Collection; (add.info.: The Transvaal Crisis)

Background imageTransvaal Crisis Collection: The Transvaal Crisis (b / w photo)

The Transvaal Crisis (b / w photo)
1042821 The Transvaal Crisis (b/w photo) by English photographer, (19th century) (after); Private Collection; (add.info.: The Transvaal Crisis)

Background imageTransvaal Crisis Collection: The Transvaal Crisis (b / w photo)

The Transvaal Crisis (b / w photo)
1043028 The Transvaal Crisis (b/w photo) by English photographer, (19th century) (after); Private Collection; (add.info.: The Transvaal Crisis)

Background imageTransvaal Crisis Collection: The Transvaal Crisis, Scenes on the Orange Free State Border (litho)

The Transvaal Crisis, Scenes on the Orange Free State Border (litho)
1043142 The Transvaal Crisis, Scenes on the Orange Free State Border (litho) by Dadd, Frank (1851-1929) (after); Private Collection; (add.info.: The Transvaal Crisis)

Background imageTransvaal Crisis Collection: The Transvaal Crisis, despatching Gold from the National Bank of Johannesburg to catch the Cape

The Transvaal Crisis, despatching Gold from the National Bank of Johannesburg to catch the Cape Mail (litho)
1043139 The Transvaal Crisis, despatching Gold from the National Bank of Johannesburg to catch the Cape Mail (litho) by Paget

Background imageTransvaal Crisis Collection: The Transvaal Crisis, the Exodus of British Subjects from Boer Territory (litho)

The Transvaal Crisis, the Exodus of British Subjects from Boer Territory (litho)
1043132 The Transvaal Crisis, the Exodus of British Subjects from Boer Territory (litho) by Paget, Walter Stanley (1861-1908); Private Collection; (add.info.: The Transvaal Crisis)

Background imageTransvaal Crisis Collection: The Transvaal Crisis, Scenes at the Front (engraving)

The Transvaal Crisis, Scenes at the Front (engraving)
1592744 The Transvaal Crisis, Scenes at the Front (engraving) by English School, (19th century); Private Collection; (add.info.: The Transvaal Crisis, Scenes at the Front)

Background imageTransvaal Crisis Collection: The Transvaal Crisis (b / w photo)

The Transvaal Crisis (b / w photo)
1592743 The Transvaal Crisis (b/w photo) by English Photographer, (19th century); Private Collection; (add.info.: The Transvaal Crisis. Illustration for The Illustrated London News, 14 October 1899)

Background imageTransvaal Crisis Collection: The Transvaal Crisis (engraving)

The Transvaal Crisis (engraving)
1592740 The Transvaal Crisis (engraving) by English School, (19th century); Private Collection; (add.info.: The Transvaal Crisis. Illustration for The Illustrated London News, 14 October 1899)

Background imageTransvaal Crisis Collection: The Transvaal Crisis, Laings Nek, the Scene of General Sir G Colleys Repulse on 28 January 1881

The Transvaal Crisis, Laings Nek, the Scene of General Sir G Colleys Repulse on 28 January 1881 (engraving)
1592642 The Transvaal Crisis, Laings Nek, the Scene of General Sir G Colleys Repulse on 28 January 1881 (engraving) by English School

Background imageTransvaal Crisis Collection: The Transvaal Crisis, Colonel Plumers Corps of British South African Police at Bulawayo

The Transvaal Crisis, Colonel Plumers Corps of British South African Police at Bulawayo
1593125 The Transvaal Crisis, Colonel Plumers Corps of British South African Police at Bulawayo, getting ready for an Emergency (litho) by Woodville

Background imageTransvaal Crisis Collection: The Transvaal Crisis, Scenes in South Africa (litho)

The Transvaal Crisis, Scenes in South Africa (litho)
1592710 The Transvaal Crisis, Scenes in South Africa (litho) by Wright, Henry Charles Seppings (1850-1937); Private Collection; (add.info.: The Transvaal Crisis, Scenes in South Africa)

Background imageTransvaal Crisis Collection: The Transvaal Crisis, British Troops for South African Service (b / w photo)

The Transvaal Crisis, British Troops for South African Service (b / w photo)
1592617 The Transvaal Crisis, British Troops for South African Service (b/w photo) by English Photographer, (19th century); Private Collection; (add.info.: The Transvaal Crisis)

Background imageTransvaal Crisis Collection: The Transvaal Crisis (litho)

The Transvaal Crisis (litho)
1592613 The Transvaal Crisis (litho) by Wright, Henry Charles Seppings (1850-1937); Private Collection; (add.info.: The Transvaal Crisis)

Background imageTransvaal Crisis Collection: The Transvaal Crisis (b / w photo)

The Transvaal Crisis (b / w photo)
1592561 The Transvaal Crisis (b/w photo) by English Photographer, (19th century); Private Collection; (add.info.: The Transvaal Crisis. Illustration for The Illustrated London News, 2 September 1899)

Background imageTransvaal Crisis Collection: The Transvaal Crisis, Boer Military Precautions at Johannesburg (litho)

The Transvaal Crisis, Boer Military Precautions at Johannesburg (litho)
1042760 The Transvaal Crisis, Boer Military Precautions at Johannesburg (litho) by English School, (19th century); Private Collection; (add.info.: The Transvaal Crisis)

Background imageTransvaal Crisis Collection: The Transvaal Crisis, the Departure of the Balloon Section Royal Engineers from Aldershot

The Transvaal Crisis, the Departure of the Balloon Section Royal Engineers from Aldershot (engraving)
1043138 The Transvaal Crisis, the Departure of the Balloon Section Royal Engineers from Aldershot (engraving) by English School, (19th century); Private Collection; (add.info.: The Transvaal Crisis)

Background imageTransvaal Crisis Collection: The Transvaal Crisis, Characteristic Scenes in the Republics (engraving)

The Transvaal Crisis, Characteristic Scenes in the Republics (engraving)
1592679 The Transvaal Crisis, Characteristic Scenes in the Republics (engraving) by Wright, Henry Charles Seppings (1850-1937); Private Collection; (add.info.: The Transvaal Crisis)

Background imageTransvaal Crisis Collection: The Transvaal Crisis, Scenes in the South African Republic (litho)

The Transvaal Crisis, Scenes in the South African Republic (litho)
1592622 The Transvaal Crisis, Scenes in the South African Republic (litho) by Holland Tringham, Joseph (1861-1908); Private Collection; (add.info.: The Transvaal Crisis)

Background imageTransvaal Crisis Collection: The Transvaal Crisis, British Troops for South African Service (b / w photo)

The Transvaal Crisis, British Troops for South African Service (b / w photo)
1592619 The Transvaal Crisis, British Troops for South African Service (b/w photo) by English Photographer, (19th century); Private Collection; (add.info.: The Transvaal Crisis)

Background imageTransvaal Crisis Collection: The Transvaal Crisis, Horses in the Quarantine Stable after Detraining (b / w photo)

The Transvaal Crisis, Horses in the Quarantine Stable after Detraining (b / w photo)
1592593 The Transvaal Crisis, Horses in the Quarantine Stable after Detraining (b/w photo) by English Photographer, (19th century); Private Collection; (add.info.: The Transvaal Crisis)

Background imageTransvaal Crisis Collection: The Transvaal Crisis, detraining Horses for Service with Colonel Baden-Powells Force (b / w photo)

The Transvaal Crisis, detraining Horses for Service with Colonel Baden-Powells Force (b / w photo)
1592592 The Transvaal Crisis, detraining Horses for Service with Colonel Baden-Powells Force (b/w photo) by English Photographer, (19th century); Private Collection; (add.info.: The Transvaal Crisis)

Background imageTransvaal Crisis Collection: The Transvaal Crisis, Parade of Volunteers at Durban (b / w photo)

The Transvaal Crisis, Parade of Volunteers at Durban (b / w photo)
1043136 The Transvaal Crisis, Parade of Volunteers at Durban (b/w photo) by English photographer, (19th century) (after); Private Collection; (add.info.: The Transvaal Crisis)

Background imageTransvaal Crisis Collection: The Transvaal Crisis, Boer Types (b / w photo)

The Transvaal Crisis, Boer Types (b / w photo)
1043128 The Transvaal Crisis, Boer Types (b/w photo) by English photographer, (19th century) (after); Private Collection; (add.info.: The Transvaal Crisis, Boer Types)

Background imageTransvaal Crisis Collection: The Transvaal Crisis, the Abortive Demonstration in Trafalgar Square (litho)

The Transvaal Crisis, the Abortive Demonstration in Trafalgar Square (litho)
1043124 The Transvaal Crisis, the Abortive Demonstration in Trafalgar Square (litho) by Jones, George Kingston (fl.1890-1925); Private Collection; (add.info.: The Transvaal Crisis)

Background imageTransvaal Crisis Collection: The Transvaal Crisis, besieging a Recruiting Station at Cape Town (litho)

The Transvaal Crisis, besieging a Recruiting Station at Cape Town (litho)
1043115 The Transvaal Crisis, besieging a Recruiting Station at Cape Town (litho) by Hall, Sydney Prior (1842-1922) (after); Private Collection; (add.info.: The Transvaal Crisis)

Background imageTransvaal Crisis Collection: The Transvaal Crisis, Enthusiasm at Cape Town, in a Recruiting Office (litho)

The Transvaal Crisis, Enthusiasm at Cape Town, in a Recruiting Office (litho)
1043056 The Transvaal Crisis, Enthusiasm at Cape Town, in a Recruiting Office (litho) by Hatherell, William (1855-1928) (after); Private Collection; (add.info.: The Transvaal Crisis)

Background imageTransvaal Crisis Collection: The Transvaal Crisis, Troops for South Africa (engraving)

The Transvaal Crisis, Troops for South Africa (engraving)
1592673 The Transvaal Crisis, Troops for South Africa (engraving) by English School, (19th century); Private Collection; (add.info.: The Transvaal Crisis, Troops for South Africa)

Background imageTransvaal Crisis Collection: The Transvaal Crisis, Scenes in South Africa (b / w photo)

The Transvaal Crisis, Scenes in South Africa (b / w photo)
1592648 The Transvaal Crisis, Scenes in South Africa (b/w photo) by English Photographer, (19th century); Private Collection; (add.info.: The Transvaal Crisis, Scenes in South Africa)

Background imageTransvaal Crisis Collection: The Transvaal Crisis (engraving)

The Transvaal Crisis (engraving)
1592645 The Transvaal Crisis (engraving) by Wright, Henry Charles Seppings (1850-1937); Private Collection; (add.info.: The Transvaal Crisis)

Background imageTransvaal Crisis Collection: The Transvaal Crisis, British Troops for South African Service (b / w photo)

The Transvaal Crisis, British Troops for South African Service (b / w photo)
1592618 The Transvaal Crisis, British Troops for South African Service (b/w photo) by English Photographer, (19th century); Private Collection; (add.info.: The Transvaal Crisis)

Background imageTransvaal Crisis Collection: The Transvaal Crisis, British Troops for South African Service (b / w photo)

The Transvaal Crisis, British Troops for South African Service (b / w photo)
1592615 The Transvaal Crisis, British Troops for South African Service (b/w photo) by English Photographer, (19th century); Private Collection; (add.info.: The Transvaal Crisis)

Background imageTransvaal Crisis Collection: The Transvaal Crisis, Field Cornets Messenger handing over Commandos to Boer Farmers to be Ready

The Transvaal Crisis, Field Cornets Messenger handing over Commandos to Boer Farmers to be Ready for War (engraving)
1592575 The Transvaal Crisis, Field Cornets Messenger handing over Commandos to Boer Farmers to be Ready for War (engraving) by Frenzeny


All Professionally Made to Order for Quick Shipping

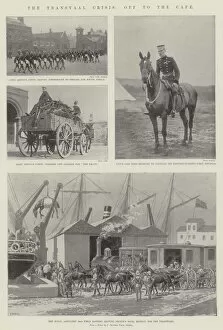
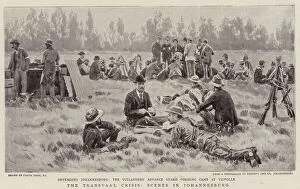
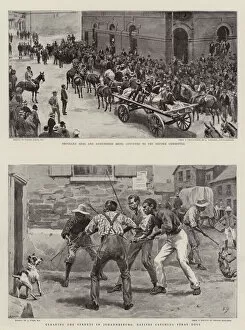
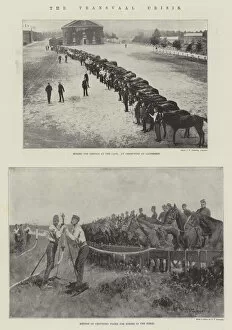
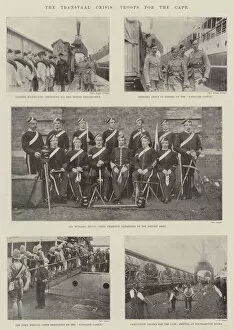
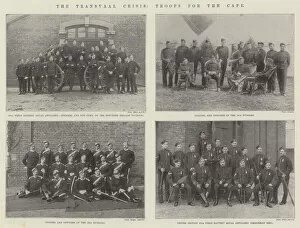
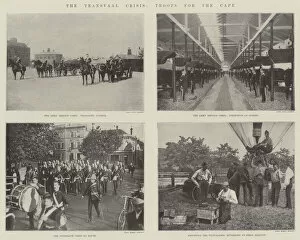
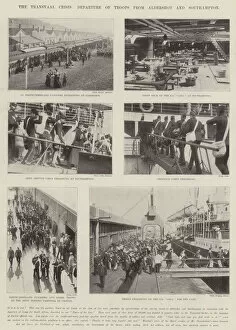
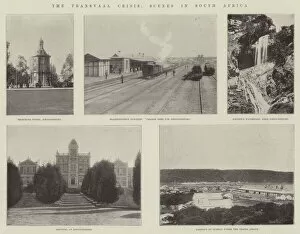
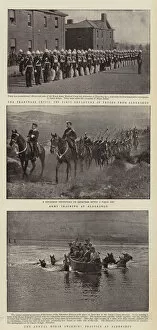
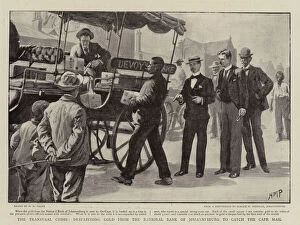
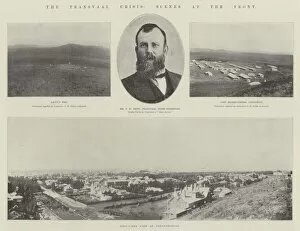
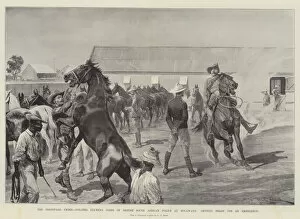
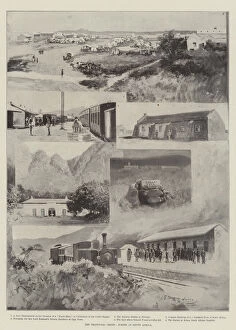
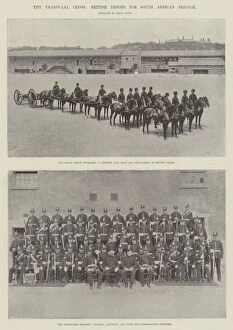
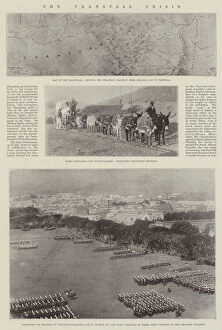
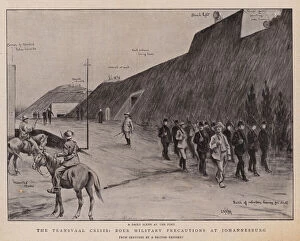
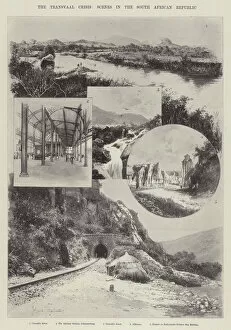
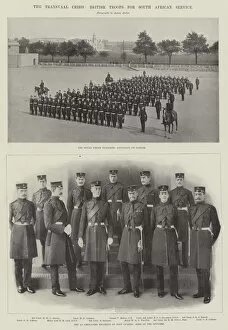
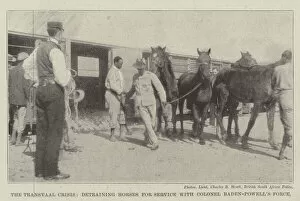
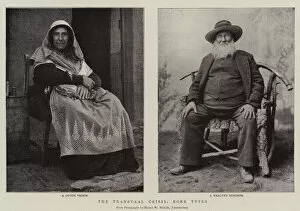
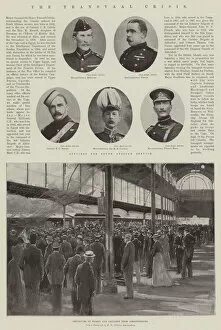
"The Transvaal Crisis: A Tumultuous Time in South African History" Amidst the chaos and tension, lithographs and black-and-white photographs capture the essence of the Transvaal Crisis. Scenes in Pretoria and Johannesburg depict a city on edge, its streets filled with anxious faces and bustling activity. The Boers' shooting practices reveal their preparedness for conflict, highlighting the escalating tensions between different factions. As uncertainty looms over the region, individuals are seen departing for Cape Town, seeking refuge from the mounting crisis. Imperial troops mobilize to address this volatile situation, their movements chronicled through lithographs that showcase their dedication to restoring order. The lithographs also provide glimpses into life within Pretoria and Johannesburg during this tumultuous period. They portray scenes of everyday life disrupted by fear and apprehension as residents navigate an uncertain future. In these images lies a visual narrative of a nation grappling with political unrest - a crisis that has gripped both cities and towns alike. The Transvaal Crisis is not just confined to one location; it permeates every corner of society. Through these lithographs and photographs, we gain insight into how this crisis impacted various aspects of daily life – from military operations to civilian routines disrupted by anxiety. It serves as a stark reminder that no community or individual was left untouched by this turbulent chapter in South African history. Ultimately, these visual records serve as reminders of our collective past – reminding us of the struggles faced by those who came before us while urging us to learn from history's lessons so that such crises may never be repeated again.