Canvas Print > Europe > United Kingdom > England > London > Towns > Welling
Canvas Print : The Turkish Defeat on the Suez Canal, c1915, (1919). Creator: Unknown
. Creator: Unknown")
. Creator: Unknown")


![]()
Canvas Prints from Heritage Images
The Turkish Defeat on the Suez Canal, c1915, (1919). Creator: Unknown
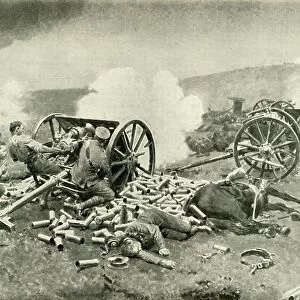
The Turkish Defeat on the Suez Canal, c1915, (1919). Scene from the First World War: The Turkish attacks on the Suez Canal [in Egypt] resulted disastrously. The German-inspired scheme of crossing the Canal on pontoons laboriously dragged across the desert was a hopeless failure, and the photograph well illustrates the heavy price paid for the enterprise. The few who reached the further side of the Canal left their bones to bleach in the desert. From " The History of the Great European War: its causes and effects", Vol. IV, by W. Stanley Macbean Knight. [Caxton Pulishing Company, Limited, London, 1919]
Heritage Images features heritage image collections
Media ID 19047583
© The Print Collector/Heritage Images
Bones Canal Caxton Publishing Company Caxton Pulishing Company Caxton Pulishing Company Lim Caxton Pulishing Company Limited Caxton Pulishing Company Ltd Dead Dead Body Defeat Defeated Desert Knight Limited North Africa Ottoman Empire Stanley Macbean Stanley Macbean Knight Suez Canal Turkey Turkish W Stanley Macbean W Stanley Macbean Knight William Stanley Macbean William Stanley Macbean Knight
30"x20" (76x51cm) Canvas Print
Step back in time with our Media Storehouse Canvas Print featuring the poignant image of The Turkish Defeat on the Suez Canal, c1915, (1919). Witness the historical significance of this First World War scene, where the Turkish attacks on the Suez Canal in Egypt resulted in a disastrous outcome. This captivating, vintage photograph from Heritage Images is now available in a high-quality canvas print, adding depth and texture to your home or office decor. Bring the past to life with this intriguing piece of history.
Delivered stretched and ready to hang our premium quality canvas prints are made from a polyester/cotton blend canvas and stretched over a 1.25" (32mm) kiln dried knot free wood stretcher bar. Packaged in a plastic bag and secured to a cardboard insert for safe transit.
Canvas Prints add colour, depth and texture to any space. Professionally Stretched Canvas over a hidden Wooden Box Frame and Ready to Hang
Estimated Product Size is 76.2cm x 50.8cm (30" x 20")
These are individually made so all sizes are approximate
Artwork printed orientated as per the preview above, with landscape (horizontal) orientation to match the source image.
FEATURES IN THESE COLLECTIONS
> Africa
> Egypt
> Related Images
> Animals
> Mammals
> Muridae
> Desert Mouse
> Arts
> Artists
> C
> William Caxton
> Arts
> Artists
> W
> William White
> Asia
> Turkey
> Related Images
> Europe
> United Kingdom
> England
> London
> Towns
> Welling
> Historic
> World War I and II
> World War I
> Historic
> World War I and II
The Turkish Defeat on the Suez Canal, c1915
EDITORS COMMENTS
. This haunting print captures a grim scene from the First World War: the failed Turkish attacks on the Suez Canal in Egypt. The photograph, taken by an unknown creator in 1919, serves as a stark reminder of the heavy price paid for this ill-fated enterprise. The German-inspired scheme to cross the canal using pontoons dragged across the unforgiving desert proved to be a hopeless failure. As depicted in this image, only a few managed to reach the further side of the canal before meeting their tragic demise. Their bones now lie scattered across the arid landscape, bleached by relentless sun and time. From "The History of Great European War: its causes and effects" by W. Stanley Macbean Knight, we learn that these brave souls were part of an Ottoman Empire expeditionary force that suffered defeat at great cost. Their bodies serve as silent testimony to their valiant but ultimately futile efforts. As we contemplate this somber photograph, let us remember those who lost their lives during this tumultuous period in history. It stands as a testament not only to human courage and sacrifice but also as a cautionary tale about war's devastating consequences.
MADE IN AUSTRALIA
Safe Shipping with 30 Day Money Back Guarantee
FREE PERSONALISATION*
We are proud to offer a range of customisation features including Personalised Captions, Color Filters and Picture Zoom Tools
SECURE PAYMENTS
We happily accept a wide range of payment options so you can pay for the things you need in the way that is most convenient for you
* Options may vary by product and licensing agreement. Zoomed Pictures can be adjusted in the Cart.