Home > Africa > Related Images
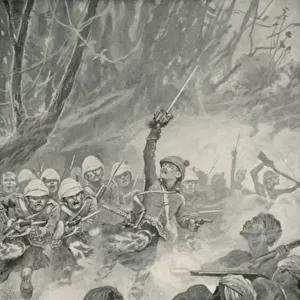
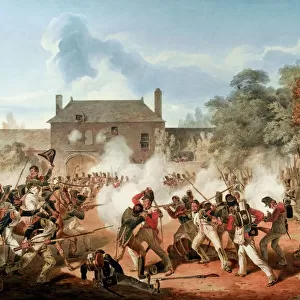
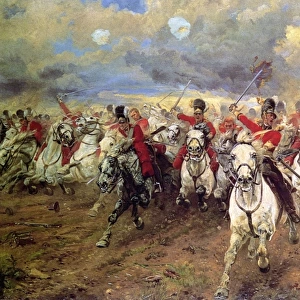
The Battle Of Colenso, Natal, South Africa During The Second Boear War. Queens Royal West Surrey Regiment Leading The Central Attack. From The Book South Africa And The Transvaal War By Louis Creswicke, Published 1900

![]()
Wall Art and Photo Gifts from Design Pics
The Battle Of Colenso, Natal, South Africa During The Second Boear War. Queens Royal West Surrey Regiment Leading The Central Attack. From The Book South Africa And The Transvaal War By Louis Creswicke, Published 1900
Design Pics offers Distinctively Different Imagery representing over 1,500 contributors
Media ID 18191679
© Ken Welsh / Design Pics
Africa African Armies Army Attack Attacking Battle Boer Conflict Natal Queens Regiment Royal Second Soldier Soldiers South Surrey Troops Warfare West Colenso
FEATURES IN THESE COLLECTIONS
> Africa
> Related Images
> Africa
> South Africa
> Related Images
> Europe
> United Kingdom
> England
> Surrey
> Related Images
> Historic
> Battles
> Related Images
EDITORS COMMENTS
This print captures a pivotal moment in history - the Battle of Colenso during the Second Boer War. The image showcases the Queens Royal West Surrey Regiment fearlessly leading the central attack, as they charge forward with unwavering determination. Published in 1900 by Louis Creswicke in his renowned book "South Africa and the Transvaal War" this photograph serves as a powerful reminder of the intense conflict that engulfed Natal, South Africa. The soldiers depicted here epitomize bravery and resilience, embodying the spirit of countless troops who fought valiantly during this tumultuous period. Their uniforms bear witness to their allegiance to Queen and country, while their focused expressions reveal their readiness for battle. As we gaze upon this historical snapshot, we are transported back to an era defined by warfare and struggle. The composition expertly captures both the chaos and orderliness of combat - smoke billows from cannons in the distance, while disciplined ranks advance towards their objective. Ken Welsh's skillful reproduction ensures that every detail is preserved with utmost clarity. This print serves not only as a visual testament to one specific battle but also as a symbol of sacrifice and heroism exhibited by all those involved in conflicts throughout history. Whether displayed on its own or incorporated into a larger collection of war memorabilia, this image evokes emotions ranging from admiration for these brave soldiers to reflection on humanity's enduring capacity for courage amidst adversity.
MADE IN AUSTRALIA
Safe Shipping with 30 Day Money Back Guarantee
FREE PERSONALISATION*
We are proud to offer a range of customisation features including Personalised Captions, Color Filters and Picture Zoom Tools
SECURE PAYMENTS
We happily accept a wide range of payment options so you can pay for the things you need in the way that is most convenient for you
* Options may vary by product and licensing agreement. Zoomed Pictures can be adjusted in the Cart.