Home > Animals > Birds > Passerines > New Zealand Wrens > Rifleman
From Laings Nek to Standerton, the Boer Retirement before Buller (b / w photo)
")
![]()
Wall Art and Photo Gifts from Fine Art Finder
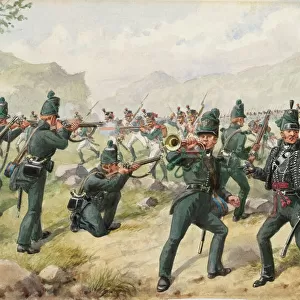
From Laings Nek to Standerton, the Boer Retirement before Buller (b / w photo)
1600151 From Laings Nek to Standerton, the Boer Retirement before Buller (b/w photo) by English Photographer, (20th century); Private Collection; (add.info.: From Laings Nek to Standerton, the Boer Retirement before Buller. Illustration for The Illustrated London News, 15 September 1900.
English Photographer (20th Century)); Look and Learn / Illustrated Papers Collection
Media ID 22264414
© Look and Learn / Illustrated Papers Collection / Bridgeman Images
Amusement Back Yard Boers Buller Captivity Custody Departure Destroyed Husbands Laings Nek Majuba Hill Second Boer War Veldt Visiting West Hollanders Standerton
FEATURES IN THESE COLLECTIONS
> Africa
> South Africa
> Related Images
> Animals
> Birds
> Passerines
> New Zealand Wrens
> Rifleman
> Architecture
> Tunnels
> Arts
> Artists
> Related Images
> Fine Art Finder
> Artists
> English Photographer
> Fine Art Finder
> Artists
> J. Macfarlane
EDITORS COMMENTS
This print titled "From Laings Nek to Standerton, the Boer Retirement before Buller" captures a poignant moment during the Second Boer War. Taken by an English photographer in the 20th century, this image showcases the aftermath of a military retreat. In the backdrop of a desolate veldt landscape, we see the remnants of destroyed boer trenches and a once bustling standerton hotel. A Scottish rifleman stands guard in what was once a lively backyard, now reduced to custody. The atmosphere is somber as husbands visit their wives held captive by the enemy. Amongst this scene of devastation, there is also an element of unexpected amusement. Hollander women from Hollanders can be seen engaging with boers in conversation, perhaps offering solace amidst chaos. The photograph provides historical insight into this significant period in South African history. It depicts not only physical destruction but also emotional turmoil experienced by both sides involved in the conflict. This image was originally published as an illustration for The Illustrated London News on September 15th, 1900. Preserved within a private collection and made available through Bridgeman Images' Fine Art Finder platform, it serves as a reminder of past struggles and offers viewers an opportunity to reflect on human resilience during times of war.
MADE IN AUSTRALIA
Safe Shipping with 30 Day Money Back Guarantee
FREE PERSONALISATION*
We are proud to offer a range of customisation features including Personalised Captions, Color Filters and Picture Zoom Tools
SECURE PAYMENTS
We happily accept a wide range of payment options so you can pay for the things you need in the way that is most convenient for you
* Options may vary by product and licensing agreement. Zoomed Pictures can be adjusted in the Cart.