Home > Africa > South Africa > Related Images
The Zulu War (engraving)
")
![]()
Wall Art and Photo Gifts from Fine Art Finder
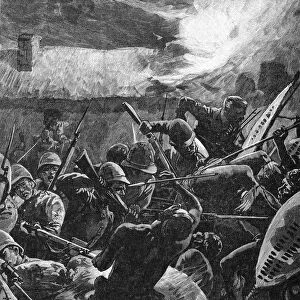
The Zulu War (engraving)
1099722 The Zulu War (engraving) by English School, (19th century); Private Collection; (add.info.: The Zulu War. Illustration for The Illustrated London News, 23 August 1879.); Look and Learn / Illustrated Papers Collection; English, out of copyright
Media ID 23512596
© Look and Learn / Illustrated Papers Collection / Bridgeman Images
Anglo Zulu War Attempt Land Signal Station Sir Garnet Wolseley Zulu War
FEATURES IN THESE COLLECTIONS
> Africa
> South Africa
> Related Images
> Arts
> Artists
> Related Images
> Fine Art Finder
> Artists
> English School
> Fine Art Finder
> Artists
> Samuel Read
> Fine Art Finder
> Temp Classification
> Services
> Royal Navy
The Zulu War - A Glimpse into the Historic Battle
EDITORS COMMENTS
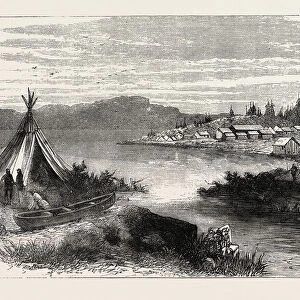
. This photo print, titled "The Zulu War (engraving)" takes us back to the 19th century and immerses us in one of history's most significant conflicts. The image showcases a pivotal moment during the Anglo-Zulu War, as depicted by an English School artist for The Illustrated London News on August 23,1879. In this scene, we witness a bustling port at Durnford in South Africa. Ships dotting the horizon hint at the maritime power supporting British forces engaged in battle against the formidable Zulu warriors. A signal station stands tall atop a hill, serving as a vital communication hub between Sir Garnet Wolseley's army and navy troops. The engraving captures both anticipation and tension as armed forces gather on land. It offers a glimpse into an audacious attempt by British military strategists to overcome their fierce adversaries with coordinated naval and ground operations. As we delve deeper into this historical masterpiece from Bridgeman Images' Fine Art Finder collection, it becomes evident that this print is not just about war; it symbolizes resilience, strategy, and determination amidst adversity. Through its intricate details and skilled craftsmanship, this artwork transports us back to an era when nations clashed over territorial dominance. It serves as a reminder of the sacrifices made by countless soldiers who fought valiantly for their countries while also shedding light on the complex dynamics that shaped colonial history. Whether you are an
MADE IN AUSTRALIA
Safe Shipping with 30 Day Money Back Guarantee
FREE PERSONALISATION*
We are proud to offer a range of customisation features including Personalised Captions, Color Filters and Picture Zoom Tools
SECURE PAYMENTS
We happily accept a wide range of payment options so you can pay for the things you need in the way that is most convenient for you
* Options may vary by product and licensing agreement. Zoomed Pictures can be adjusted in the Cart.