Home > Arts > Landscape paintings > Waterfall and river artworks > River artworks
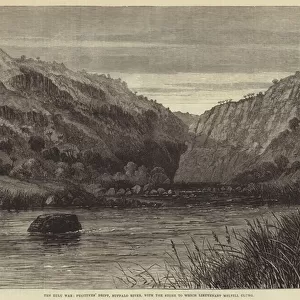
The Zulu War, Luneberg and the Pongola River (engraving)
")
![]()
Wall Art and Photo Gifts from Fine Art Finder
The Zulu War, Luneberg and the Pongola River (engraving)
1106638 The Zulu War, Luneberg and the Pongola River (engraving) by English School, (19th century); Private Collection; (add.info.: The Zulu War, Luneberg and the Pongola River. Illustration for The Illustrated London News, 3 May 1879.); Look and Learn / Illustrated Papers Collection; English, out of copyright
Media ID 22210022
© Look and Learn / Illustrated Papers Collection / Bridgeman Images
Anglo Zulu War Zulu War Luneberg
FEATURES IN THESE COLLECTIONS
> Africa
> South Africa
> Related Images
> Arts
> Artists
> Related Images
> Arts
> Landscape paintings
> Waterfall and river artworks
> River artworks
> Fine Art Finder
> Artists
> English School
> Fine Art Finder
> Artists
> William 'Crimea' (after)
> Fine Art Finder
> Temp Classification
EDITORS COMMENTS
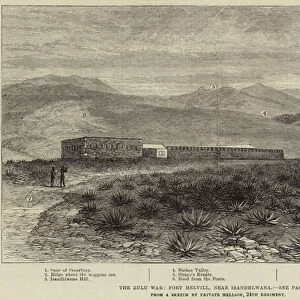
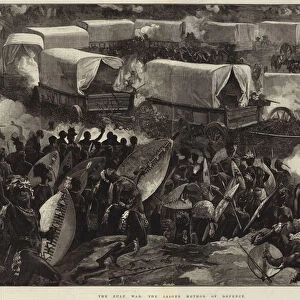
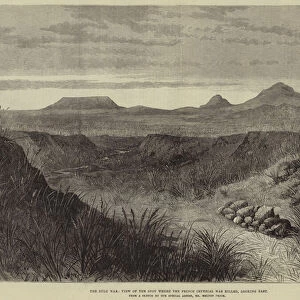
This engraving, titled "The Zulu War, Luneberg and the Pongola River" takes us back to a significant chapter in history - the Anglo-Zulu War of the 19th century. The image showcases a scene that appeared in The Illustrated London News on May 3,1879. As we delve into this print, our eyes are immediately drawn to the intricate details depicting the topography of South Africa during this tumultuous period. The artist from English School skillfully captures the essence of Luneberg and its surroundings, particularly highlighting the majestic Pongola River flowing through it. The composition exudes an air of both tranquility and tension simultaneously. On one hand, we witness serene landscapes with lush vegetation lining the riverbanks. However, lurking beneath this picturesque facade lies an undercurrent of conflict as British forces engage in battle against Zulu warriors. This engraving serves as a visual reminder of how geography played a crucial role in shaping military strategies during this war. It allows us to appreciate not only the artistic talent behind its creation but also provides insight into historical events that unfolded along these very shores. Preserved within private collections for years, this print now resurfaces thanks to Bridgeman Images' efforts. Its availability offers art enthusiasts and history buffs alike an opportunity to explore and reflect upon a pivotal moment in time - forever etched onto paper by skilled hands long ago.
MADE IN AUSTRALIA
Safe Shipping with 30 Day Money Back Guarantee
FREE PERSONALISATION*
We are proud to offer a range of customisation features including Personalised Captions, Color Filters and Picture Zoom Tools
SECURE PAYMENTS
We happily accept a wide range of payment options so you can pay for the things you need in the way that is most convenient for you
* Options may vary by product and licensing agreement. Zoomed Pictures can be adjusted in the Cart.