Fine Art Print : The Battle of Magersfontein


![]()
Fine Art Prints from Mary Evans Picture Library
The Battle of Magersfontein
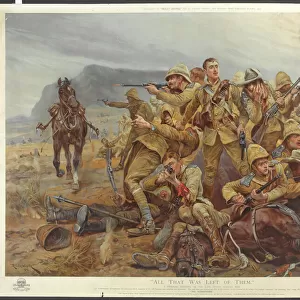
The Battle of Magersfontein: Gordons covering the retreat of the Highland Brigade. The battle was fought during the Second Boer War (1899-1902).
1900
Mary Evans Picture Library makes available wonderful images created for people to enjoy over the centuries
Media ID 14413636
© Illustrated London News Ltd/Mary Evans
Boer Conflict Covering Highland Retreat Wars Magersfontein
21"x14" (+3" Border) Fine Art Print
Step into history with our exquisite Fine Art Print of 'The Battle of Magersfontein' by Illustrated London News Ltd/Mary Evans. This captivating print, dating back to 1900, depicts a pivotal moment during the Second Boer War as the Highland Brigade makes a valiant retreat, with the Gordon Highlanders covering their exit. Each print is meticulously produced using high-quality materials, ensuring vibrant colors and stunning detail that bring history to life in your home or office. Add a touch of timeless elegance and historical significance to your space with this magnificent Fine Art Print from Media Storehouse.
21x14 image printed on 27x20 Fine Art Rag Paper with 3" (76mm) white border. Our Fine Art Prints are printed on 300gsm 100% acid free, PH neutral paper with archival properties. This printing method is used by museums and art collections to exhibit photographs and art reproductions.
Our fine art prints are high-quality prints made using a paper called Photo Rag. This 100% cotton rag fibre paper is known for its exceptional image sharpness, rich colors, and high level of detail, making it a popular choice for professional photographers and artists. Photo rag paper is our clear recommendation for a fine art paper print. If you can afford to spend more on a higher quality paper, then Photo Rag is our clear recommendation for a fine art paper print.
Estimated Image Size (if not cropped) is 35.5cm x 53.3cm (14" x 21")
Estimated Product Size is 50.8cm x 68.6cm (20" x 27")
These are individually made so all sizes are approximate
Artwork printed orientated as per the preview above, with portrait (vertical) orientation to match the source image.
EDITORS COMMENTS
The Battle of Magersfontein: Gordons covering the retreat of the Highland Brigade The Battle of Magersfontein, fought on December 11, 1899, during the Second Boer War (1899-1902), is a pivotal moment in military history. This image captures the intense scene of the Highland Brigade's retreat, led by Lord Frederick Sleigh Roberts, 1st Earl Roberts, and Lt. Col. Evelyn Wood, as they covered the withdrawal of their troops. The Boer forces, under the command of General Piet Cronje, had launched a surprise attack on the British camp near Magersfontein, South Africa. The initial assault was successful, and the British forces were taken aback, leading to a chaotic and disorganized retreat. In this photograph, members of the Highland Brigade, specifically the Gordon Highlanders, are seen forming a defensive line to protect their comrades as they withdraw. The soldiers are shown with fixed bayonets, determined expressions, and steady posture, demonstrating their unwavering resolve in the face of adversity. The Battle of Magersfontein was a turning point in the Second Boer War. Despite the initial defeat, the British forces regrouped and went on to secure several victories, ultimately leading to the end of the conflict. This image serves as a poignant reminder of the bravery and resilience displayed by the soldiers involved in this historic battle. The Second Boer War was a complex and brutal conflict, with both sides suffering significant losses. The war ended in 1902, and the Treaty of Vereeniging was signed, granting the Boers self-governance within the British Empire. This photograph offers a glimpse into the intense and chaotic moments of this significant historical event.
MADE IN AUSTRALIA
Safe Shipping with 30 Day Money Back Guarantee
FREE PERSONALISATION*
We are proud to offer a range of customisation features including Personalised Captions, Color Filters and Picture Zoom Tools
FREE COLORIZATION SERVICE
You can choose advanced AI Colorization for this picture at no extra charge!
SECURE PAYMENTS
We happily accept a wide range of payment options so you can pay for the things you need in the way that is most convenient for you
* Options may vary by product and licensing agreement. Zoomed Pictures can be adjusted in the Cart.