Framed Print > Europe > United Kingdom > England > London > Towns > Lee
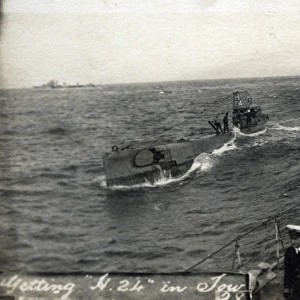
Framed Print : British naval action in Narvik harbour by G. H. Davis


![]()
Framed Photos from Mary Evans Picture Library
British naval action in Narvik harbour by G. H. Davis
The Royal Navys first heroic dash into Narvik harbour in face of tremendous odds: German destroyers and store ships sunk. Captain Warburton-Lee led the second destroyer flotilla in to attack greatly superior forces. HMS Hunter was sunk and HMS Hardy driven ashore. One enemy destroyer was sunk, two were set on fire, and all supply ships were destroyed.
10 April 1940
Mary Evans Picture Library makes available wonderful images created for people to enjoy over the centuries
Media ID 14133015
© Illustrated London News Ltd/Mary Evans
Action Ashore Attack Dash Davis Destroyed Destroyer Destroyers Double Driven Enemy Flotilla Hardy Heroic Hunter Narvik Spread Store Sunk Supply Warburton
A2 Premium Frame with A3 Poster
Experience the thrill of history with our Framed Prints featuring "British Naval Action in Narvik Harbour" by G. H. Davis from Illustrated London News Ltd/Mary Evans. This iconic image, taken from Mary Evans Prints Online, captures the Royal Navy's daring first assault on Narvik harbour during World War II. Witness the heroic dash of Captain Warburton-Lee and his second destroyer flotilla as they bravely faced German destroyers and store ships, resulting in significant victories against tremendous odds. Add this historical masterpiece to your home or office decor and relive the courage and determination of the British navy.
Premium Paradise Wooden Range A2 Premium Poster Frame (62x45cm) with A3 Poster (42x30cm) and mounted behind a white matt board to make your photo really stand out. FSC Certified and Rainforest Alliance Certified for environmental, social, and economic sustainably. High transparency tempered glass window with a smooth finished frame. Great for filling empty walls, decorating blank spaces, or creating eye-catching gallery walls. Frames arrive ready to hang. Sent with secure, protective packaging. Smooth wooden veneer mimics the real wood look and feel with ultra-durable scratch resistance tempered glass.
Contemporary Framed and Mounted Prints - Professionally Made and Ready to Hang
Estimated Image Size (if not cropped) is 40.4cm x 40.4cm (15.9" x 15.9")
Estimated Product Size is 62cm x 44.6cm (24.4" x 17.6")
These are individually made so all sizes are approximate
Artwork printed orientated as per the preview above, with landscape (horizontal) or portrait (vertical) orientation to match the source image.
EDITORS COMMENTS
This striking photograph captures the heroic actions of the British Royal Navy in Narvik harbour on 10 April 1940, during the early stages of World War II. In the face of tremendous odds, Captain Warburton-Lee led the second destroyer flotilla in a daring attack against greatly superior German forces. The British naval forces faced off against numerous destroyers and supply ships, which were crucial to the German occupation of Narvik. The photo depicts the aftermath of the intense battle, with HMS Hunter and HMS Hardy taking center stage. HMS Hunter, a British destroyer, was sunk during the engagement, while HMS Hardy was driven ashore. Despite the losses, the British forces managed to inflict significant damage on the enemy. One German destroyer was sunk, two were set on fire, and all supply ships were destroyed. This heroic dash into Narvik harbour marked a crucial turning point in the campaign to reclaim the town from the Germans. The bravery and determination of the British sailors in the face of overwhelming enemy forces showcased the resilience and fighting spirit of the Royal Navy during wartime. This photograph, taken by renowned war correspondent G.H. Davis for the Illustrated London News, is a testament to the courage and sacrifice of the British forces during World War II.
MADE IN AUSTRALIA
Safe Shipping with 30 Day Money Back Guarantee
FREE PERSONALISATION*
We are proud to offer a range of customisation features including Personalised Captions, Color Filters and Picture Zoom Tools
SECURE PAYMENTS
We happily accept a wide range of payment options so you can pay for the things you need in the way that is most convenient for you
* Options may vary by product and licensing agreement. Zoomed Pictures can be adjusted in the Cart.