Mouse Mat > Africa > South Africa > Maps
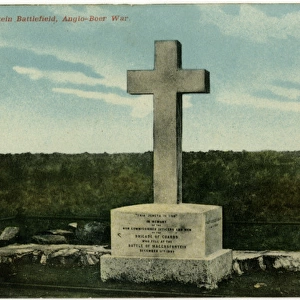
Mouse Mat : Plan Of Site Of The Engagement At Spion Kop. From The Book South Africa And The Transvaal War By Louis Creswicke, Published 1900

![]()
Home Decor from Design Pics
Plan Of Site Of The Engagement At Spion Kop. From The Book South Africa And The Transvaal War By Louis Creswicke, Published 1900
Design Pics offers Distinctively Different Imagery representing over 1,500 contributors
Media ID 18191571
© Ken Welsh / Design Pics
Africa African Anglo Boer Battle Boer Conflict Engagement Plan Second Site Soldier Soldiers South Transvaal Spion
Mouse Pad
Bring some life into your office, or create a heartfelt gift, with a personalised deluxe Mouse Mat. Made of high-density black foam with a tough, stain-resistant inter-woven cloth cover they will brighten up any home or corporate office.
Archive quality photographic print in a durable wipe clean mouse mat with non slip backing. Works with all computer mice
Estimated Product Size is 24.2cm x 19.7cm (9.5" x 7.8")
These are individually made so all sizes are approximate
Artwork printed orientated as per the preview above, with landscape (horizontal) or portrait (vertical) orientation to match the source image.
FEATURES IN THESE COLLECTIONS
> Africa
> South Africa
> Maps
> Africa
> South Africa
> Related Images
> Historic
> Battles
> Related Images
> Maps and Charts
> Related Images
EDITORS COMMENTS
This print captures a historic moment in the Anglo-Boer War, specifically the engagement at Spion Kop. Taken from Louis Creswicke's renowned book "South Africa and the Transvaal War" published in 1900, this plan of the site provides a detailed overview of the battlefield. The image showcases an intricately drawn map that depicts the exact location where this significant battle took place. The South African landscape unfolds before our eyes, revealing rolling hills and vast plains that served as a backdrop for this intense conflict. In the foreground, we see soldiers positioned strategically on both sides, ready to engage in combat. These brave men represent different factions involved in this 19th-century war - British forces against Boer fighters. Their presence adds depth and humanizes this historical event. Ken Welsh's expertly crafted print allows us to delve into history and explore one of the most crucial battles fought during this tumultuous period. It serves as a reminder of the sacrifices made by countless individuals who fought for their respective causes. Whether you are an avid history enthusiast or simply appreciate remarkable artwork, this print is sure to captivate your imagination and transport you back to a time when conflicts shaped nations and defined identities.
MADE IN AUSTRALIA
Safe Shipping with 30 Day Money Back Guarantee
FREE PERSONALISATION*
We are proud to offer a range of customisation features including Personalised Captions, Color Filters and Picture Zoom Tools
SECURE PAYMENTS
We happily accept a wide range of payment options so you can pay for the things you need in the way that is most convenient for you
* Options may vary by product and licensing agreement. Zoomed Pictures can be adjusted in the Cart.