Photographic Print > Africa > Related Images
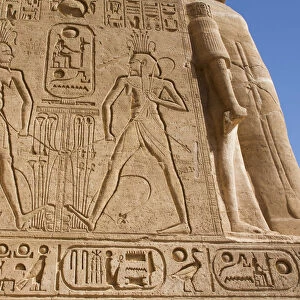
Photographic Print : Seti I temple (13th century BC), Abydos, Egypt
, Abydos, Egypt")

![]()
Photo Prints from Discover Images by AWL
Seti I temple (13th century BC), Abydos, Egypt
Discover Images by AWL is a world-leading brand of premium quality travel images
Media ID 19471047
© Ivan Vdovin / AWL Images
13th Century Bc Abydos Archeological Archeology Arts Egypt Egyptian Hieroglyph Hieroglyphs Ivan Vdovin Maghreb Mid East North African Relief Reliefs
15"x10" (37.5x25cm) Poster
Experience the grandeur of ancient Egypt with our exquisite photographic print of the Seti I Temple in Abydos. Captured by the skilled lens of IV from Discover Images by AWL, this stunning image transports you back in time to the 13th century BC. The intricately carved temple walls and towering pillars of Seti I stand proud against the backdrop of the golden desert sands, a testament to the rich history and artistic mastery of this ancient civilization. Bring the mystery and wonder of Egypt into your home or office with this beautiful and authentic photographic print.
High-quality poster prints are available in a range of sizes and are printed on 270 gsm semi-glossy silk finish poster paper. An affordable option for decorating any space, they are perfect for fixing straight onto walls. To ensure your poster arrives in good condition, we roll and send them in strong mailing tubes.
Our Photo Prints are in a large range of sizes and are printed on Archival Quality Paper for excellent colour reproduction and longevity. They are ideal for framing (our Framed Prints use these) at a reasonable cost. Alternatives include cheaper Poster Prints and higher quality Fine Art Paper, the choice of which is largely dependant on your budget.
Estimated Product Size is 37.5cm x 25cm (14.8" x 9.8")
These are individually made so all sizes are approximate
Artwork printed orientated as per the preview above, with landscape (horizontal) or portrait (vertical) orientation to match the source image.
FEATURES IN THESE COLLECTIONS
> Africa
> Egypt
> Related Images
> Africa
> Related Images
EDITORS COMMENTS
This print showcases the majestic Seti I temple, a remarkable testament to ancient Egyptian civilization. Located in Abydos, Egypt, this awe-inspiring structure dates back to the 13th century BC and stands as an iconic symbol of art and archaeology. The image captures the intricate details of the temple's reliefs adorned with hieroglyphs, showcasing the mastery of ancient Egyptian craftsmanship. Each stroke tells a story from a bygone era, transporting viewers into a world filled with mystery and wonder. Abydos itself holds great significance in North African history, serving as an important religious center for centuries. The temple dedicated to Pharaoh Seti I is not only an architectural marvel but also a pilgrimage site for those seeking spiritual enlightenment. As we gaze upon this photograph taken by Ivan Vdovin, we are transported through time and space to witness the grandeur of ancient Egypt. The warm hues and delicate lighting bring out every detail on these weathered walls, reminding us that even after thousands of years, their beauty remains intact. Whether you are an avid traveler or simply fascinated by history and culture, this print serves as a window into one of humanity's most extraordinary achievements – offering glimpses into our shared past while igniting curiosity about what lies beyond our own horizons.
MADE IN AUSTRALIA
Safe Shipping with 30 Day Money Back Guarantee
FREE PERSONALISATION*
We are proud to offer a range of customisation features including Personalised Captions, Color Filters and Picture Zoom Tools
SECURE PAYMENTS
We happily accept a wide range of payment options so you can pay for the things you need in the way that is most convenient for you
* Options may vary by product and licensing agreement. Zoomed Pictures can be adjusted in the Cart.