Home > Europe > United Kingdom > England > Devon > Caton
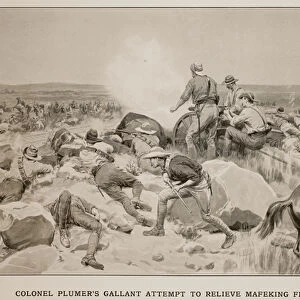
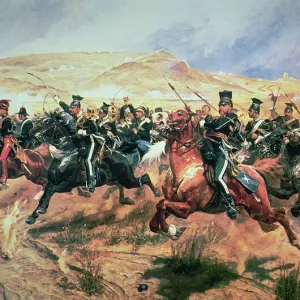
The great assault on Ladysmith: The Devons Clearing Wagon Hill (litho)
")
![]()
Wall Art and Photo Gifts from Fine Art Finder
The great assault on Ladysmith: The Devons Clearing Wagon Hill (litho)
STC363425 The great assault on Ladysmith: The Devons Clearing Wagon Hill (litho) by Maud, William T. (1865-1903); Private Collection; (add.info.: The Second Boer War (1899-1902); South Africa; 2nd Boer War; pith helmets; Boers; fleeing; soldiers; British Army; fighting; soldier; military uniform; attack; attacking; battlefield; battle; advance; advancing; firing; aiming; shooting; gun; guns; death; dying; rifle; rifles; bayonets; troops; Siege of Ladysmith; ); The Stapleton Collection; English, out of copyright
Media ID 22679028
© The Stapleton Collection / Bridgeman Images
FEATURES IN THESE COLLECTIONS
> Africa
> South Africa
> Related Images
> Arts
> Artists
> M
> William T. Maud
> Europe
> United Kingdom
> England
> Devon
> Caton
> Europe
> United Kingdom
> Scotland
> Aberdeenshire
> Maud
> Fine Art Finder
> Artists
> Richard Caton II (after) Woodville
> Fine Art Finder
> Artists
> William T. Maud
> Fine Art Finder
> War & Military Scenes: 20th Century
> Popular Themes
> Devon
The Great Assault on Ladysmith - The Devons Clearing Wagon Hill
EDITORS COMMENTS
. This lithograph captures a pivotal moment during the Second Boer War, showcasing the heroic efforts of the British Army's Devonshire Regiment as they valiantly clear Wagon Hill. Painted by William T. Maud, this print offers a glimpse into the intensity and chaos of battle. In this scene, soldiers in their distinctive pith helmets are seen bravely advancing towards their enemy amidst a hailstorm of gunfire. The Boers can be seen fleeing in fear as the Devons press forward with unwavering determination. Each soldier is depicted with meticulous detail, capturing their military uniforms and resolute expressions. The artist skillfully portrays the grim reality of war - fallen soldiers lie scattered across the battlefield, rifles still clutched tightly in their hands. Bayonets gleam ominously in the sunlight as troops relentlessly push forward against all odds. This lithograph serves as a poignant reminder of both heroism and sacrifice during times of conflict. It immortalizes an important chapter in history when brave men fought for what they believed was right. As we gaze upon this powerful image from our private collection, let us remember those who have fought and continue to fight for freedom and justice around the world.
MADE IN AUSTRALIA
Safe Shipping with 30 Day Money Back Guarantee
FREE PERSONALISATION*
We are proud to offer a range of customisation features including Personalised Captions, Color Filters and Picture Zoom Tools
SECURE PAYMENTS
We happily accept a wide range of payment options so you can pay for the things you need in the way that is most convenient for you
* Options may vary by product and licensing agreement. Zoomed Pictures can be adjusted in the Cart.