Fraud Blocker Skip to main content

Home > Arts > Landscape paintings > Waterfall and river artworks > River artworks

With the Troops on the Modder River (b / w photo)

With the Troops on the Modder River (b  /  w photo)


Photo Prints
Jigsaw Puzzles
Poster Prints
Canvas Prints
Fine Art Prints
Metal Prints
Cards
Home Decor


We accept all major credit cards

Fine Art Finder

Wall Art and Photo Gifts from Fine Art Finder

With the Troops on the Modder River (b / w photo)

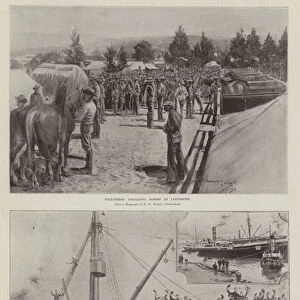
1599292 With the Troops on the Modder River (b/w photo) by English Photographer, (20th century); Private Collection; (add.info.: With the Troops on the Modder River. Illustration for The Illustrated London News, 17 February 1900.
English Photographer (20th Century)); Look and Learn / Illustrated Papers Collection

Media ID 22274118

© Look and Learn / Illustrated Papers Collection / Bridgeman Images

Highland Brigade Lord Roberts Modder River Second Boer War


FEATURES IN THESE COLLECTIONS

> Africa > South Africa > Related Images

> Arts > Artists > Related Images

> Arts > Landscape paintings > Waterfall and river artworks > River artworks

> Europe > United Kingdom > Scotland > Highlands > Related Images

> Fine Art Finder > Artists > English Photographer

> Fine Art Finder > Artists > Thomas Walter Wilson


EDITORS COMMENTS
This print titled "With the Troops on the Modder River" captures a significant moment from history during the Second Boer War. Taken by an English photographer in the 20th century, this image is part of a private collection that sheds light on a crucial period in South African history. The photograph showcases members of the 18th battery, Highland Brigade, alongside General MacDonald and Lord Roberts. It offers a glimpse into life at camp near Modder River, where troops were stationed during this intense conflict. The soldiers are depicted amidst their daily routines, showcasing camaraderie and resilience despite challenging circumstances. Notably, this image also reveals elements beyond military operations. A boer prison can be seen in the background as well as Koodoosberg and Wilsons Hotel nearby. These details provide valuable insight into both sides of war - capturing not only moments of combat but also glimpses into civilian life amidst conflict. Preserved through photography, this historical document serves as a reminder of the sacrifices made by those involved in the Second Boer War. Its inclusion in The Illustrated London News further emphasizes its significance to contemporary audiences seeking to understand past events. Bridgeman Images has preserved this piece from their Look and Learn / Illustrated Papers Collection for future generations to appreciate and learn from our shared history.

MADE IN AUSTRALIA
Safe Shipping with 30 Day Money Back Guarantee

FREE PERSONALISATION*
We are proud to offer a range of customisation features including Personalised Captions, Color Filters and Picture Zoom Tools

SECURE PAYMENTS
We happily accept a wide range of payment options so you can pay for the things you need in the way that is most convenient for you

* Options may vary by product and licensing agreement. Zoomed Pictures can be adjusted in the Cart.


redeem
Beautiful Photo Prints and Gifts
image
Professionally Printed
thumb_up
Professional quality finish
diamond
Made with high-grade materials
inventory_2
Carefully packed to aid safe arrival


Related Images


The great assault on Ladysmith: The Devons Clearing Wagon Hill (litho)
Troops at Naauwpoort during the Boer War
British soldiers aboard railway wagons, c. 1900 (photograph, stereoscopic)
1899 map of South Africa at the time of the Second Boer War. Such was the interest in the progress of the war that maps like this were produced with a number of flags of both sides in the margin which could be cut out and placed on the map so as to follow military movements
The Transvaal War, Troops for the Front (litho)
The Transvaal Crisis, Troops for the Cape (b / w photo)
The Transvaal Crisis, Departure of Troops from Aldershot and Southampton (b / w photo)
The South African War, Campaigning, and after (b / w photo)
Capture of Boer Convoy by General Frenchs Troops near Kimberley (litho)
The surrender of Kroonstadt: Troops marching past Lord Roberts and staff
With General French: New Zealanders saving a picket of the Yorkshire Regiment near
Space shuttle Endeavour is framed by a windsock at the launch pad at Kennedy Space Center

+

Shipping

+

Choices

+

Reviews

+

Guaranteed


Related Collections


South Africa Related Images
Browse 10,282 Prints
Artists Related Images
Browse 479,727 Prints
Highlands Related Images
Browse 6,520 Prints
English Photographer
Browse 35,391 Prints
Thomas Walter Wilson
Browse 548 Prints
River artworks
River artworks
Browse 48,191 Prints