Home > Europe > United Kingdom > England > London > Transport > Stations
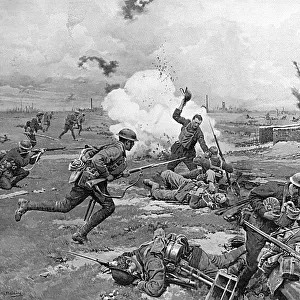
The Transvaal War (litho)
")
![]()
Wall Art and Photo Gifts from Fine Art Finder
The Transvaal War (litho)
1592991 The Transvaal War (litho) by Holland Tringham, Joseph (1861-1908); Private Collection; (add.info.: The Transvaal War. Illustration for The Illustrated London News, 9 December 1899.
Holland Tringham); Look and Learn / Illustrated Papers Collection
Media ID 22552994
© Look and Learn / Illustrated Papers Collection / Bridgeman Images
Estcourt Headquarters High Road Hotel Military Camps Mooi River Natal Pietermaritzburg Railway Station Second Boer War Tents Transvaal War Howick Westwards
FEATURES IN THESE COLLECTIONS
> Africa
> South Africa
> Related Images
> Arts
> Artists
> Related Images
> Arts
> Landscape paintings
> Waterfall and river artworks
> River artworks
> Europe
> United Kingdom
> England
> London
> Transport
> Railway
> Europe
> United Kingdom
> England
> London
> Transport
> Stations
> Fine Art Finder
> Artists
> Joseph Holland Tringham
> Fine Art Finder
> Artists
> Samuel (after) Begg
The Transvaal War - A Glimpse into History
EDITORS COMMENTS
. This print takes us back to the tumultuous era of the Second Boer War in South Africa. The image, captured by renowned artist Holland Tringham, transports us to a scene bustling with activity at Mooi River Station. As we delve deeper into this historical snapshot, we are drawn to the intricate details that unfold before our eyes. The composition reveals a sprawling landscape dotted with military camps and tents, showcasing the strategic headquarters during this significant conflict. Major General Barton's presence is felt as he oversees operations amidst the backdrop of an enchanting hotel and a busy railway station. The topography surrounding Mooi River adds depth and character to this engraving, highlighting its importance as a pivotal location during the war. The high road leading westwards serves as a lifeline for troops moving towards their next destination. Every element within this image tells a story - from Estcourt and Natal in the distance to Howick and Pietermaritzburg on either side. It captures not only the physicality of war but also evokes emotions tied to sacrifice, bravery, and resilience. As we gaze upon this remarkable piece from Bridgeman Images' collection, it becomes clear that it offers more than just aesthetic appeal; it provides us with an opportunity to reflect on history's defining moments while appreciating Tringham's artistic prowess in immortalizing them through his lithographic masterpiece.
MADE IN AUSTRALIA
Safe Shipping with 30 Day Money Back Guarantee
FREE PERSONALISATION*
We are proud to offer a range of customisation features including Personalised Captions, Color Filters and Picture Zoom Tools
SECURE PAYMENTS
We happily accept a wide range of payment options so you can pay for the things you need in the way that is most convenient for you
* Options may vary by product and licensing agreement. Zoomed Pictures can be adjusted in the Cart.