Photo Mug > Africa > Egypt > Alexandria
Photo Mug : Ships of the Air versus Ships of the Desert, First World War, (c1920). Creator: Unknown
. Creator: Unknown")
. Creator: Unknown")

![]()
Home Decor from Heritage Images
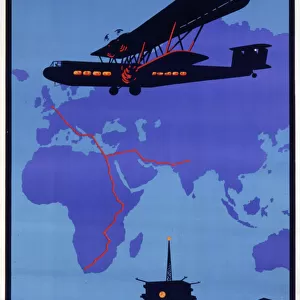
Ships of the Air versus Ships of the Desert, First World War, (c1920). Creator: Unknown
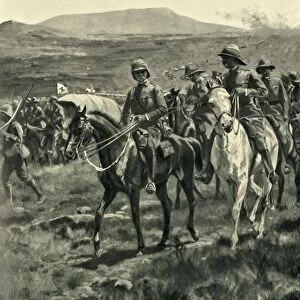
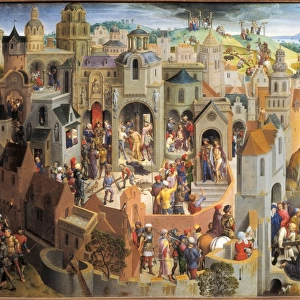
Ships of the Air versus Ships of the Desert, First World War, (c1920). British aeroplanes bombing a Senussi camel convoy laden with ammunition...The sketch by a British officer from which the drawing was made was accompanied by the following note: " In the region of Baharia Wells, south of Dabaa, one of the four great wells in the desert between Alexandria and Matruh, two of our aeroplanes accomplished a very hazardous feat in dropping bombs on a Senussi village and demolishing a camel convoy. Some camels were laden with high-explosives, and violent explosions occurred, causing great damage." The Senussi campaign was fought by the Kingdom of Italy and the British Empire against the Senussi, a religious order in Libya and Egypt, from November 1915 to February 1917. Drawn by F. de Haenen. From " The Great World War: A History", Volume V, edited by Frank A Mumby. [The Gresham Publishing Company Ltd, London, c1920]
Heritage Images features heritage image collections
Media ID 19665745
© The Print Collector/Heritage Images
A History Aeroplane Aeroplanes Air Force Air Transport Airplane Arab Arabs Bombing Camel Camels De Haenen De Haenen Frederic Desert Frank A Frank A Mumby Frank Arthur Frank Arthur Mumby Frederic Frederic De Haenen Gresham Publishing Co Ltd Gresham Publishing Company Haenen Frederic De Keystone Archives Mumby Mumby Frank A Mumby Frank Arthur North Africa Plane Planes Royal Flying Corps The Great World War The Great World War A History Haenen
Photo Mug
Step back in time with our Media Storehouse Photo Mug featuring an intriguing image from the First World War. This captivating design showcases a British officer's sketch of "Ships of the Air versus Ships of the Desert," pitting British aeroplanes against a Senussi camel convoy laden with ammunition. Add a personal touch to your daily routine with this vintage-inspired mug, showcasing a unique piece of history from the early 1900s. Perfect for aviation enthusiasts, history buffs, or anyone who appreciates the beauty of the past. Each mug is printed with high-quality, fade-resistant ink to ensure your design remains vibrant and clear, making it a great gift for any occasion.
A personalised photo mug blends sentimentality with functionality, making an ideal gift for cherished loved ones, close friends, or valued colleagues. Preview may show both sides of the same mug.
Elevate your coffee or tea experience with our premium white ceramic mug. Its wide, comfortable handle makes drinking easy, and you can rely on it to be both microwave and dishwasher safe. Sold in single units, preview may show both sides of the same mug so you can see how the picture wraps around.
Mug Size is 9.6cm high x 8.1cm diameter (3.8" x 3.2")
These are individually made so all sizes are approximate
FEATURES IN THESE COLLECTIONS
> Africa
> Egypt
> Alexandria
> Africa
> Libya
> Related Images
> Africa
> Related Images
> Africa
> South Africa
> Related Images
> Animals
> Mammals
> Muridae
> Desert Mouse
> Arts
> Artists
> H
> Frederic de Haenen
> Arts
> Artists
> W
> Frank Weller
> Europe
> Italy
> Related Images
EDITORS COMMENTS
This print titled "Ships of the Air versus Ships of the Desert" captures a pivotal moment during the First World War. Taken around 1920, it depicts British aeroplanes bombing a Senussi camel convoy loaded with ammunition in the region of Baharia Wells, south of Dabaa. The sketch from which this drawing was made was accompanied by a note written by a British officer who witnessed the event firsthand. He describes how two brave aeroplanes undertook an incredibly dangerous mission to demolish a Senussi village and destroy their camel convoy. Some camels were carrying high-explosives, resulting in violent explosions that caused significant damage. The context behind this image lies within the larger Senussi campaign fought between November 1915 and February 1917. The Kingdom of Italy and the British Empire joined forces against the Senussi, who were a religious order based in Libya and Egypt at that time. Drawn by F. de Haenen and featured in "The Great World War: A History" edited by Frank A Mumby, this print offers us a glimpse into one small but impactful episode during this historic conflict. It serves as a reminder of both the ingenuity displayed by aviators during wartime and the harsh realities faced on both land and air fronts alike.
MADE IN AUSTRALIA
Safe Shipping with 30 Day Money Back Guarantee
FREE PERSONALISATION*
We are proud to offer a range of customisation features including Personalised Captions, Color Filters and Picture Zoom Tools
SECURE PAYMENTS
We happily accept a wide range of payment options so you can pay for the things you need in the way that is most convenient for you
* Options may vary by product and licensing agreement. Zoomed Pictures can be adjusted in the Cart.