Poster Print > Fine Art Storehouse > Map
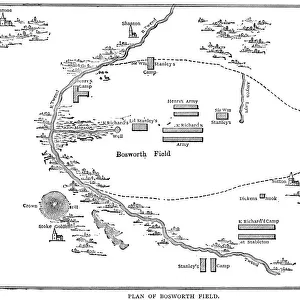
Poster Print : Second Boer War - Battle of Belmont


![]()
Poster Prints from Fine Art Storehouse
Second Boer War - Battle of Belmont
Vintage engraving of a plan of the Battle of Belmont an engagement of the Second Boer War on 23 November 1899, where the British under Lord Methuen assaulted a Boer position on Belmont kopje
Unleash your creativity and transform your space into a visual masterpiece!
duncan1890
Media ID 13667235
© duncan1890
94456 Anglo Boer War Battle Battlefield Boer British Military Diagram Document Equipment Historical War Event Information Equipment Military Navigational Equipment Plan Printed Media South Africa Southern Africa Styles Victorian Style
A4 (29.7 x 21cm) Poster Print
Step back in time with our vintage engraving of the Battle of Belmont from the Media Storehouse range of Poster Prints. This captivating piece, created by duncan1890 from the Fine Art Storehouse, offers a unique insight into the Second Boer War. The intricate details of this plan of the engagement on Belmont kopje on 23 November 1899, where Lord Methuen led the British forces against a Boer position, make for an engaging and educational display in any room. Bring a piece of history into your home or office with this stunning poster print.
Premium quality poster prints are printed on luxurious semi-gloss satin 270 gsm paper. Our meticulously crafted poster prints offer an affordable option for decorating any space, making them ideal for living rooms, bedrooms, offices and beyond. To ensure your poster arrives in good condition, we roll and send them in strong mailing tubes.
Poster prints are budget friendly enlarged prints in standard poster paper sizes (A0, A1, A2, A3 etc). Whilst poster paper is sometimes thinner and less durable than our other paper types, they are still ok for framing and should last many years. Our Archival Quality Photo Prints and Fine Art Paper Prints are printed on higher quality paper and the choice of which largely depends on your budget.
Estimated Product Size is 30.3cm x 21.6cm (11.9" x 8.5")
These are individually made so all sizes are approximate
Artwork printed orientated as per the preview above, with landscape (horizontal) orientation to match the source image.
FEATURES IN THESE COLLECTIONS
> Fine Art Storehouse
> History
> Battles & Wars
> Historcal Battle Maps and Plans
> Fine Art Storehouse
> Map
> Historical Maps
EDITORS COMMENTS
This vintage engraving captures the intensity and strategic planning of the Battle of Belmont during the Second Boer War. Taking place on 23 November 1899, this historic engagement saw Lord Methuen leading British forces in an assault against a well-fortified Boer position on Belmont kopje. The engraved image provides a detailed illustration and diagram of the battlefield, showcasing Victorian-style military tactics. The print serves as a valuable historical document, offering insights into the past and shedding light on one of Africa's significant war events. It showcases navigational equipment used by both sides, highlighting the importance of accurate information for effective decision-making during warfare. With its intricate details and meticulous craftsmanship, this printed media transports viewers back to a time when conflicts were fought with different styles and strategies. The image not only depicts the clash between British and Boer forces but also symbolizes resilience, determination, and sacrifice exhibited by soldiers from both sides. While it is important to note that this print does not pertain to any specific company or commercial use, it remains an invaluable piece for history enthusiasts seeking to explore South Africa's rich military heritage. Whether displayed in homes or educational institutions, this artwork invites contemplation about the complexities of war while honoring those who participated in shaping our shared history.
MADE IN AUSTRALIA
Safe Shipping with 30 Day Money Back Guarantee
FREE PERSONALISATION*
We are proud to offer a range of customisation features including Personalised Captions, Color Filters and Picture Zoom Tools
SECURE PAYMENTS
We happily accept a wide range of payment options so you can pay for the things you need in the way that is most convenient for you
* Options may vary by product and licensing agreement. Zoomed Pictures can be adjusted in the Cart.