Fine Art Print > Arts > Artists > O > William Heysham Overend
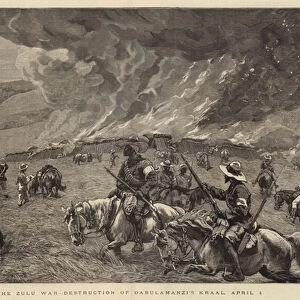
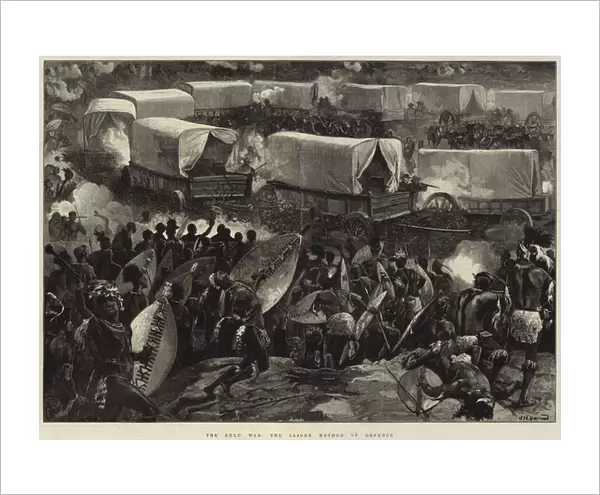
Fine Art Print : The Zulu War, the Laager Method of Defence (engraving)
")
![]()
Fine Art Prints from Fine Art Finder
The Zulu War, the Laager Method of Defence (engraving)
1106750 The Zulu War, the Laager Method of Defence (engraving) by Overend, William Heysham (1851-98) (after); Private Collection; (add.info.: The Zulu War, the Laager Method of Defence. Illustration for The Illustrated London News, 5 April 1879.); Look and Learn / Illustrated Papers Collection; British, out of copyright
Media ID 23048278
© Look and Learn / Illustrated Papers Collection / Bridgeman Images
20"x16" (+3" Border) Fine Art Print
Step back in time with our exquisite Fine Art Print of "The Zulu War, the Laager Method of Defence" by William Heysham Overend. This captivating engraving, originally published in the late 19th century, offers a fascinating glimpse into the historic events of the Zulu War. Witness the strategic use of the laager defense, a military tactic employed by European settlers to protect themselves against Zulu attacks. Add this stunning piece to your collection and bring a touch of history into your home or office.
20x16 image printed on 26x22 Fine Art Rag Paper with 3" (76mm) white border. Our Fine Art Prints are printed on 300gsm 100% acid free, PH neutral paper with archival properties. This printing method is used by museums and art collections to exhibit photographs and art reproductions.
Our fine art prints are high-quality prints made using a paper called Photo Rag. This 100% cotton rag fibre paper is known for its exceptional image sharpness, rich colors, and high level of detail, making it a popular choice for professional photographers and artists. Photo rag paper is our clear recommendation for a fine art paper print. If you can afford to spend more on a higher quality paper, then Photo Rag is our clear recommendation for a fine art paper print.
Estimated Image Size (if not cropped) is 50.8cm x 37.4cm (20" x 14.7")
Estimated Product Size is 66cm x 55.9cm (26" x 22")
These are individually made so all sizes are approximate
Artwork printed orientated as per the preview above, with landscape (horizontal) orientation to match the source image.
FEATURES IN THESE COLLECTIONS
> Fine Art Finder
> Artists
> English School
> Fine Art Finder
> Artists
> William Heysham (after) Overend
> Fine Art Finder
> Temp Classification
> Africa
> South Africa
> Related Images
> Arts
> Artists
> O
> William Heysham Overend
EDITORS COMMENTS
This print takes us back to the intense and dramatic era of the Zulu War, specifically showcasing the Laager Method of Defence. The engraving, created by William Heysham Overend in 1879 for The Illustrated London News, perfectly captures the tension and ingenuity displayed during this historic conflict. The image transports us to South Africa, where British forces faced off against the formidable Zulu warriors. In their quest for survival, they adopted a defensive strategy known as the Laager Method of Defence. This technique involved forming a circular formation with wagons or other vehicles as a protective barrier against enemy attacks. As we gaze at this print, we can almost feel the palpable fear and anticipation that must have filled the air during those turbulent times. The intricate details meticulously etched into every line reveal not only Overend's artistic skill but also his dedication to accurately depicting historical events. It is through images like these that we gain insight into significant moments in history - moments that shaped nations and defined cultures. This particular engraving serves as a reminder of both human resilience and adaptability in times of adversity. In preserving this piece from Fine Art Finder's collection, Bridgeman Images allows us to appreciate not only its aesthetic value but also its historical significance. It stands as a testament to those who fought bravely on both sides during one of Africa's most impactful conflicts – an enduring symbol of courage amidst chaos.
MADE IN AUSTRALIA
Safe Shipping with 30 Day Money Back Guarantee
FREE PERSONALISATION*
We are proud to offer a range of customisation features including Personalised Captions, Color Filters and Picture Zoom Tools
SECURE PAYMENTS
We happily accept a wide range of payment options so you can pay for the things you need in the way that is most convenient for you
* Options may vary by product and licensing agreement. Zoomed Pictures can be adjusted in the Cart.